Installations (Traps, Bait Stations, Monitoring Stations and POIs)
Traps, Bait Stations Monitoring Stations and POIs (Points of Interest) are all types of installations - the fundamental parts of the Trap.NZ system.
- trap.nz New Traps overview page
- Installations overview
- Map icons - website
- Installation fields
- Adding installations
- Setting up a Bird count monitoring station
- Adding installation records
- Creating and Opening images taken using the trap.NZ App camera
- Camera trap recording and reporting including AI
- Deleting installation records
- Adding supplementary traps
- Editing a single installation
- Retiring an installation via the trap.NZ website
- Unretiring a retired installation
- Changing the trap condition to disabled
- Bulk editing installations
- Downloading installation information
- Adding one-off records
- Sorting installations
- Moving installations
- Moving installations between projects
- Deleting installations
- Deleting Supplementary traps
- Remote monitoring traps with sensor technology
- Adding One-off records - using the website
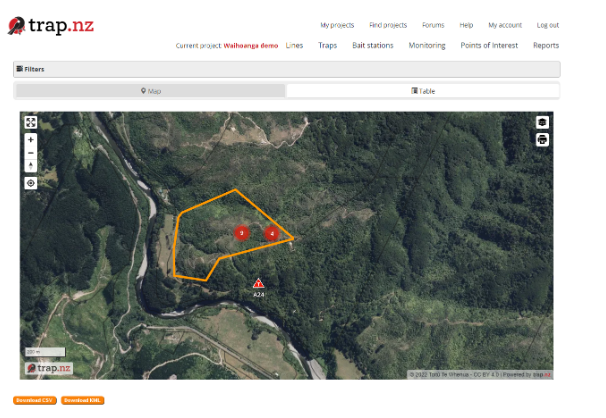
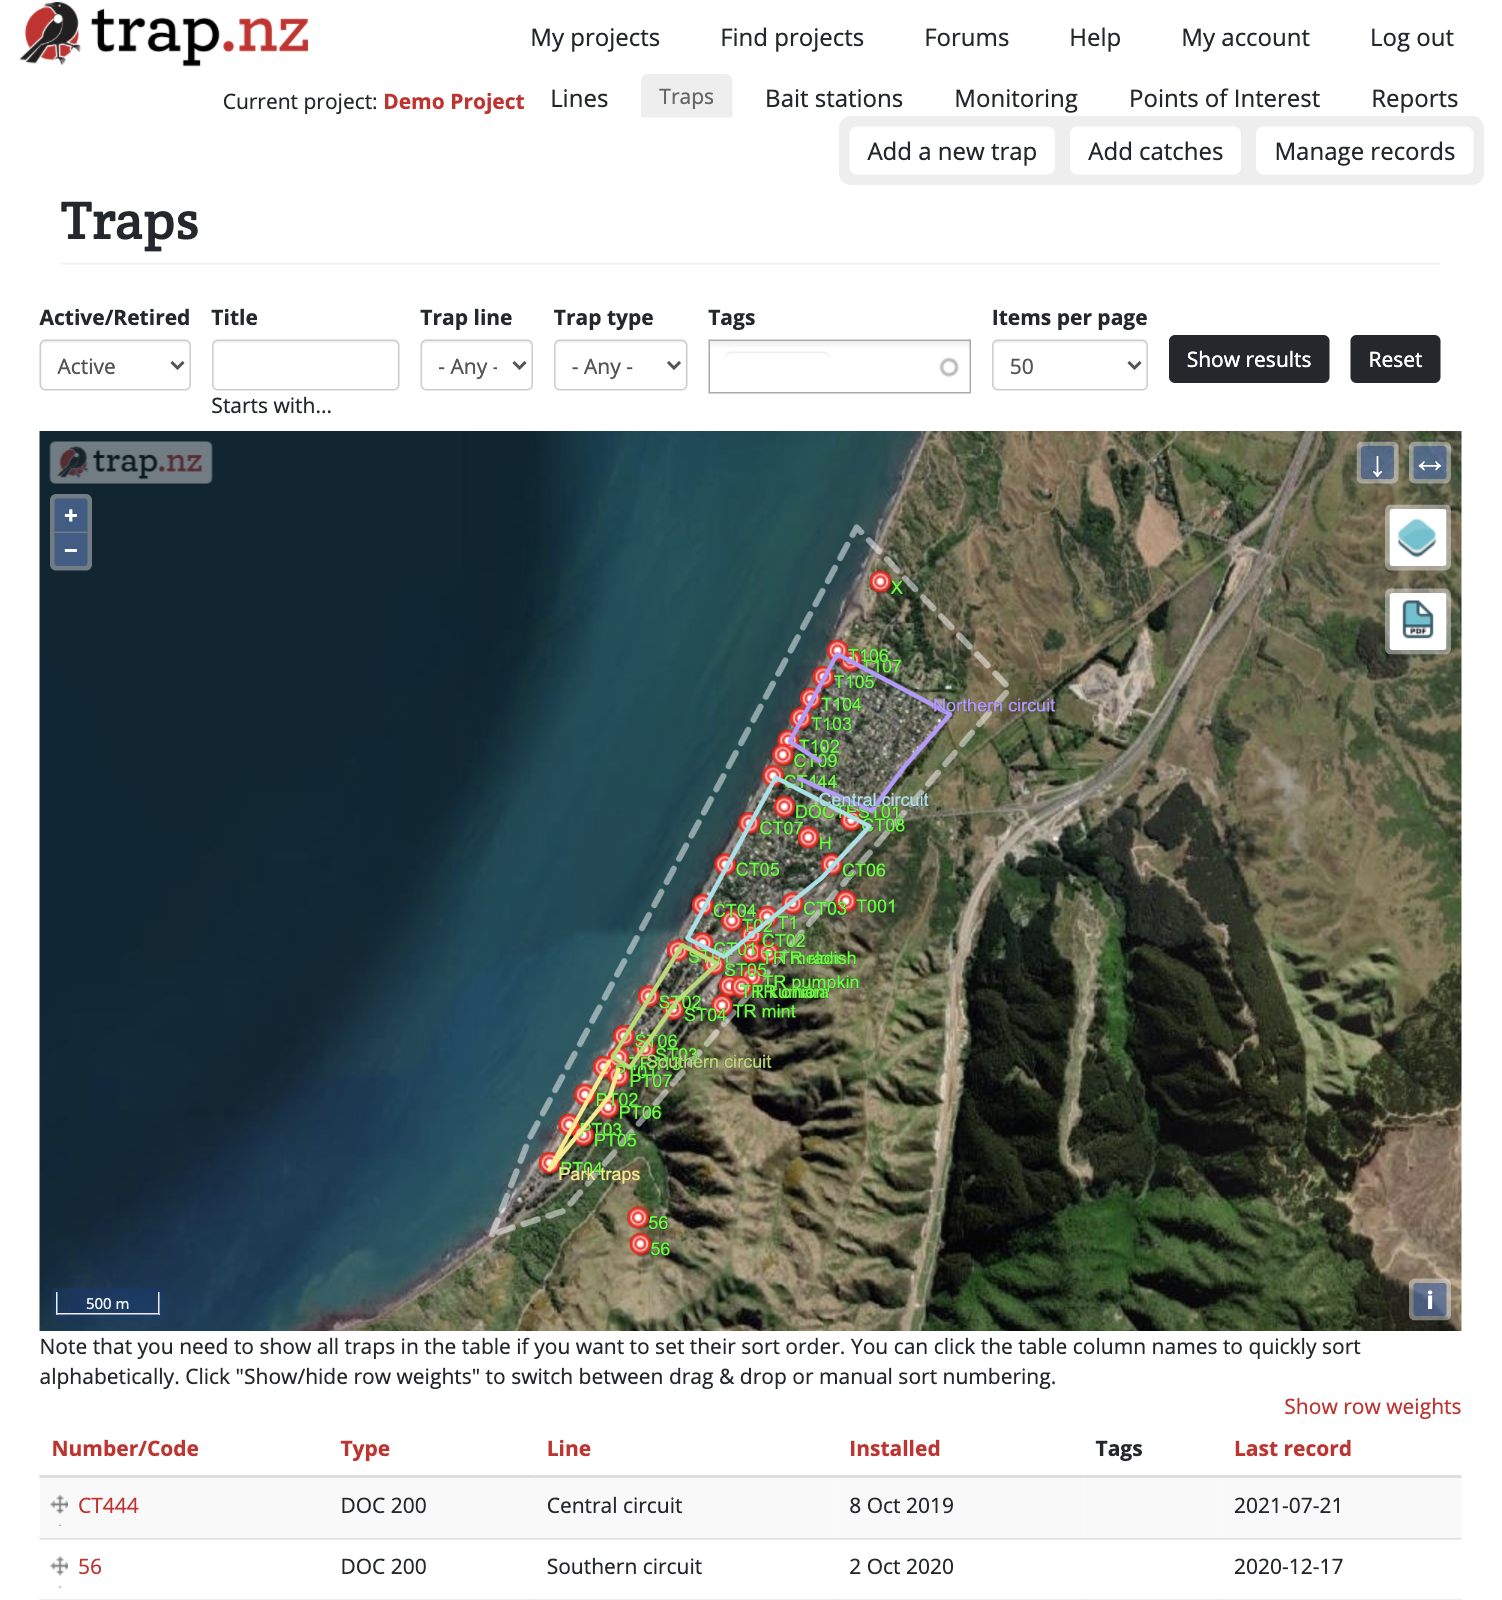
trap.nz New Traps overview page
trap.nz is always looking for ways to help the usability of our product, to aid this the new trap overview page has been developed
For video help, click the youtube link here https://youtu.be/AYgAnQ84W2o
The first noticeable change is the filters section under the station tabs which is now collapsed by default, keeping them out of the way until you need them.
When you select the filters it opens up to allow you to select the options you are wanting to change
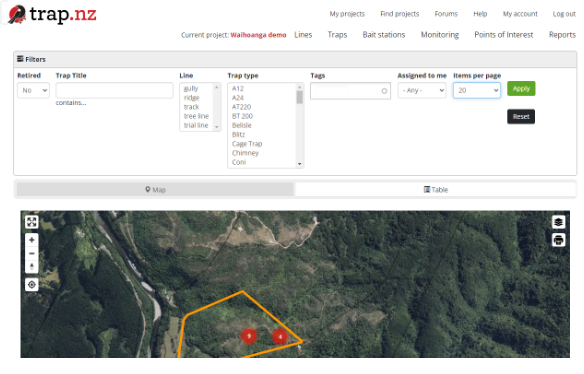
You can also switch between viewing traps as a map or table by selecting the tabs above the map
The new map has a variety of options that the old map didn’t.
You can now use your mouse to scroll in and out of the map.
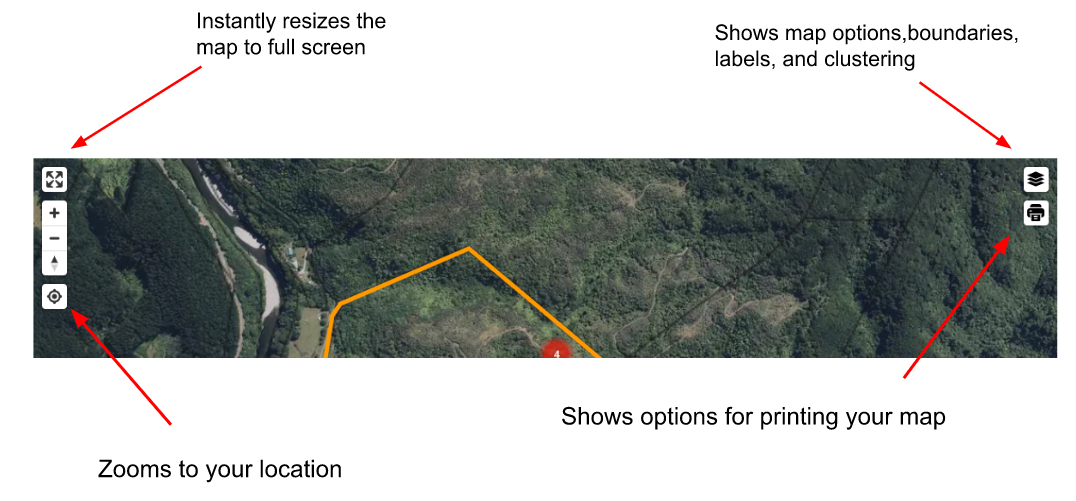
The map shows overlapping traps as clusters by default, which makes the map easier to read and aids in navigation. Clicking a cluster will expand the traps inside it and zoom in to focus on them. You can toggle clustering and labels on and off using the layer controls.

The map will remember your selections in the layer controls whenever you return to the page..
You can now tilt the maps to suit your needs, this can be achieved in three ways
1 hold the ctrl key on your keyboard and use your mouse to tilt the map from various angles
2 right click and drag
3 on the trackpad of your laptop a two-finger click and drag

The map also shows road names when aerial hybrid and topographic are selected

The new trap icons
To align with the trap.nz mobile phone app the icons have been changed to
| trap |  |
| Sensor Trap - active |  |
| Sensor trap - active & sprung |  |
| Sensor trap - inactive |  |
Adding records
You can now quickly add a new trap record or edit a trap by clicking on the individual trap on the map

Or use the table to add records

After you have entered the new trap records, you will be directed to the individual trap detail page, click the “trap” tab
You will be returned to the new trap overview, you can now select to return to the old trap overview page by clicking the link. (this is a temporary link until our members become familiar with the new trap overview page)

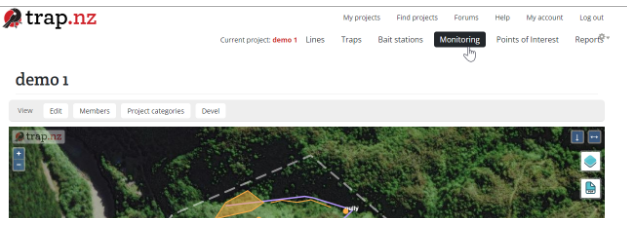
Installations overview
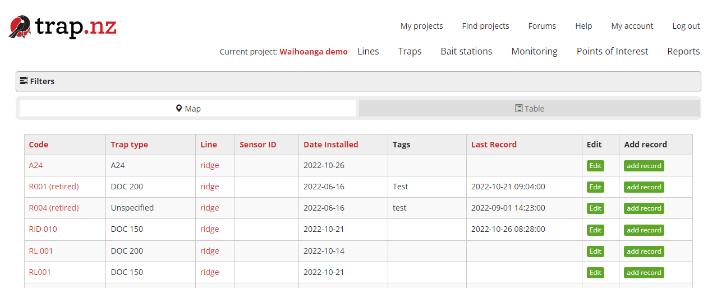
The Traps, Bait Stations, Monitoring Stations and Points of interest sections of your project allow you to view and manage your installations. It displays them visually on a map, and as a table , underneath the map after you've clicked the "Show Results" button on the filter bar.
You can view the details of an installation by clicking on its icon on the map (and then clicking the link on the popup), or by clicking its Number/Code in the table under the map.
You can also filter installations by line or type, and search for them by their name.
Map icons - website
Monitoring |
Traps |
||||||||||
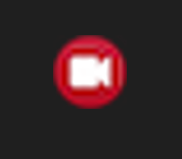
| Camera monitoring
|
|
Standard trap | 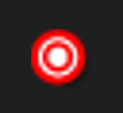 |
||||||||
| Tracking tunnel monitoring |  |
Standard trap sprung | 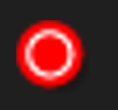 |
||||||||
| Wax block monitoring |  |
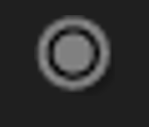
Sensor trap -Active (has an active heartbeat and is set) | 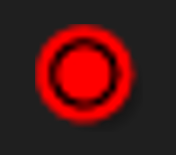 |
||||||||
| Chew card monitoring |  |
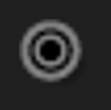
Sensor trap -Active sprung (has an active heartbeat and is sprung) |
 |
||||||||
| Monitoring can also be depicted as an orange dot |  |
Sensor trap -Inactive (unable to communicate and set) |
 |
||||||||
| Bait station |  |
Sensor trap -Inactive sprung (unable to communicate and sprung) |
 |
||||||||
| Point of interest -
as these are assigned a colour by the installer of the installation a POI can be depicted by any of the following
The new trap iconsTo align with the trap.nz mobile phone app the icons have been changed to
|
|||||||||||

Installation fields
Glossary of terms for each field for each installation
Traps
Fields for adding a trap. Required fields are indicated by *
Trap number*: a reference name for this trap (it doesn't actually have to be a number), this is what will be displayed on the map and can be whatever you wish. If you have a lot of numbered traps it is useful to add leading zeros to the number (e.g. T001, T002. etc). This will allow you to easily sort them numerically by clicking the column header.
Date installed*: defaults to today's date. This date can be used for maintenance purposes (e.g. you may want to identify traps older than a certain date for replacement).
Installed by: the name of the person who installed this trap.
Trap type*: select the type of trap from the drop-down list. If your trap type is not listed select "Unspecified" and use the "Trap subtype" field to describe it.
Double trap: check this box if the trap is a double set, or has another trap attached (you can also add supplementary traps later).
Trap sub type: optionally enter any information such as modifications.
Sensor provider: if this trap has a sensor attached, you can enter the name of the sensor make or provider (E.g. Econode, Encounter Solutions Ltd, MinkPolice, etc.). When you start typing, the matching provider names will automatically appear.
Sensor ID: the unique ID of the radio sensor from the provider (this is usually a serial number written on the sensor).
Send meta data about this trap to my sensor provider: Checking this box will provide the trap location and other details to the sensor provider. This may help them manage their networks.
Trap line: optionally select the line you would like the trap associated with. This can make it easier when recording trap data in the field.
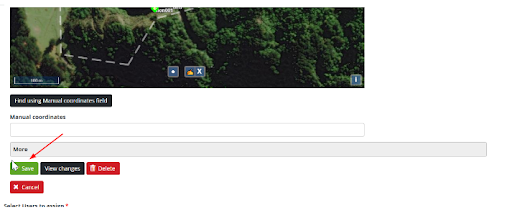
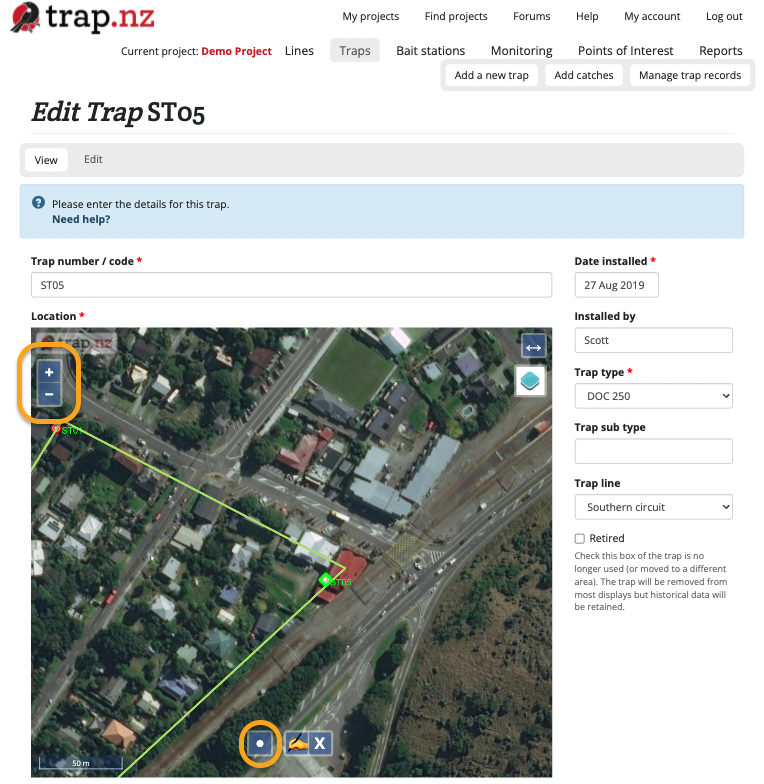
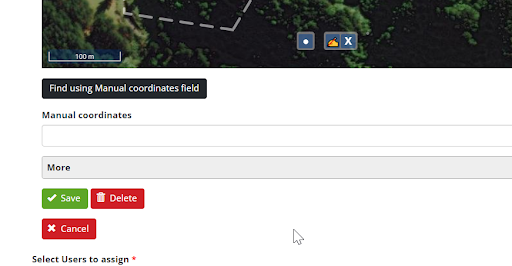
Location*: There are two different ways to place your trap on the map:
- Map: Use the Draw Point tool
 to locate the trap on the map. Hold and drag to pan around the map. Click on + or - to zoom in and out.
 - Manual coordinates: If you have a GPS location you can enter that in the Manual coordinates field and then click the "Find using Manual Coordinates field" to add it to the map.
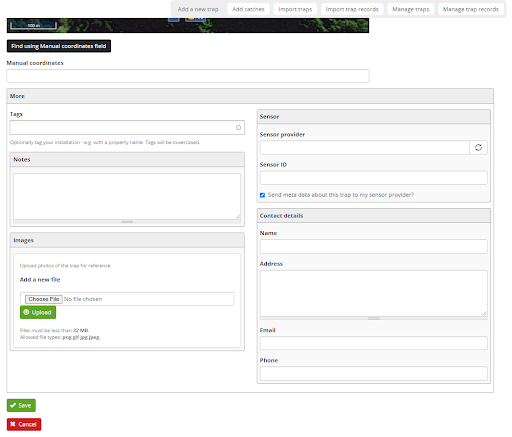
Images: you can upload one or images of this trap
Notes: enter any other information you want to keep with this trap (access, location description, etc.).
Retired: check this box if the trap is no longer used (or moved to a different area). The trap will be removed from most displays but historical data will be retained.
Bait Stations
Fields for adding a bait station. Required fields are indicated by *
Bait station number/code: your reference for this bait station. These numbers/codes will be displayed on the map.
Date Installed: defaults to today's date.
Installed by: the name of the person who installed this bait station
Type: select the type of bait station from the drop-down list. If the type is not listed select "other" and use the sub type field to describe it.
Sub type: optionally enter any information such as modifications.
Trap line: select from a list of lines you have set up (default is none). This can be used to filter the bait stations when entering records.
Location: There are two different ways to place your bait station on the map:
- Map: Use the Draw Point tool to locate the bait station on the map. Hold and drag to pan around the map. Click on + or - to zoom in and out.
- Manual coordinates: If you have a GPS location you can enter that in the Manual coordinates field and then click the "Find using Manual Coordinates field" to add it to the map.
Notes: enter any other information you want to keep with this bait station (access, location description, etc.)
Retired: check this box if the bait station is no longer used (or moved to a different area). The bait station will be removed from most displays but historical data will be retained.
Monitoring Stations
Fields for adding a standard monitoring station. Required fields are indicated by *
Number/code: your reference for this monitoring station. These numbers/codes will be displayed on the map.
Monitoring type*: select the Monitoring type from the dropdown list. You can add your own custom Monitoring types in your Project categories section.
Date Installed: defaults to today's date.
Installed by: the name of the person who installed this monitoring station
Line: select from a list of lines you have set up (default is none). This can be used to filter the monitoring stations when entering records.
Retired: check this box if the monitoring station is no longer used (or moved to a different area). The monitoring station will be removed from most displays but historical data will be retained.
Location*: There are two different ways to place your monitoring station on the map:
- Map: use the Draw Point tool to locate the monitoring station on the map. Hold and drag to pan around the map. Click on + or - to zoom in and out.
- Manual coordinates: If you have a GPS location you can enter that in the Manual coordinates field and then click the "Find using Manual Coordinates field" to add it to the map.
Notes: Any other information you want to keep with this station (e.g. access, location description, etc.)
Contact details: The contact details of a person associated with this installation (e.g. land owner)
Images: Add images to this installation (e.g. showing location)
Points of Interest
Fields for adding a standard point of interest. Required fields are indicated by *
Title: your reference for this point of interest. This will be displayed on the map.
POI: select the point of interest type from the dropdown list.
Start date: defaults to today's date.
End date: If the POI has a limited period.
Line: optionally select the line you would like the POI associated with.
Location*: There are two different ways to place your trap on the map:
- Map: Use the Draw Point tool to locate the trap on the map. Hold and drag to pan around the map. Click on + or - to zoom in and out.
- Manual coordinates: If you have a GPS location you can enter that in the Manual coordinates field and then click the "Find using Manual Coordinates field" to add it to the map.
Images: you can upload one or images of this trap
Notes: enter any other information you want to keep with this trap (access, location description, etc.).
Adding installations
Traps, bait stations, monitoring stations, and points of interest are all managed in roughly the same way. The instructions below describe how to add a new installation to a project.
You can also bulk import multiple traps, bait stations, monitoring stations, and points of interest from a CSV file. There are help blocks on each of those pages with what column names are required, and what the allowed values are for each field.
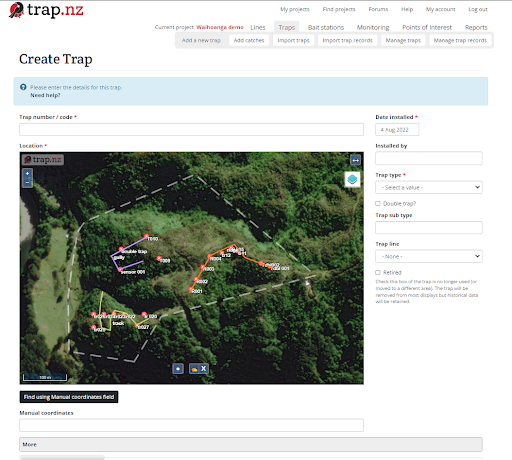
Adding traps
- From the Trap menu click add a new trap.
- Enter the details for the trap (required fields are indicated with an asterix*).
- Trap number*: a reference name for this trap (it doesn't actually have to be a number), this is what will be displayed on the map and can be whatever you wish. If you have a lot of numbered traps it is useful to add leading zeros to the number (e.g. T001, T002. etc). This will allow you to easily sort them numerically by clicking the column header.
- Date installed*: defaults to today's date. This date can be used for maintenance purposes (e.g. you may want to identify traps older than a certain date for replacement).
- Installed by: the name of the person who installed this trap.
- Trap type*: select the type of trap from the drop-down list. If your trap type is not listed select "Unspecified" and uses the "Trap subtype" field to describe it.
- Double trap: check this box if the trap is a double set, or has another trap attached (you can also add supplementary traps later).
- Trap sub type: optionally enter any information such as modifications.
- Sensor provider: if this trap has a sensor attached, you can enter the name of the sensor make or provider (E.g. Econode, Encounter Solutions Ltd, MinkPolice, etc.). When you start typing, the matching provider names will automatically appear.
- Sensor ID: the unique ID of the radio sensor from the provider (this is usually a serial number written on the sensor).
- Send meta data about this trap to my sensor provider: Checking this box will provide the trap location and other details to the sensor provider. This may help them manage their networks.
- Trap line: optionally select the line you would like the trap associated with. This can make it easier when recording trap data in the field.
- Location*: There are two alternative ways to locate your trap on the map:
- Using the map: Click the • ("Draw a point") tool at the bottom of the map and then click on the map to place a point. Ignore the "Manual coordinates" field and button.
- Using manual coordinates: Enter latitude and longitude (degrees or decimal) separated by a space or comma in the "Manual coordinates" field. Click "Find using Manual coordinates field" to place a point on the map at the specified coordinates.
- Images: you can upload one or images of this trap
- Notes: enter any other information you want to keep with this trap (access, location description, etc.).
- Retired: check this box if the trap is no longer used (or moved to a different area). The trap will be removed from most displays but historical data will be retained.
Adding bait stations
Fields for adding a bait station. Required fields are indicated by *
- Bait station number/code: your reference for this bait station. These numbers/codes will be displayed on the map.
- Date Installed: defaults to today's date.
- Installed by: the name of the person who installed this bait station
- Type: select the type of bait station from the drop-down list. If the type is not listed select "other" and use the sub type field to describe it.
- Sub type: optionally enter any information such as modifications.
- Trap line: select from list of lines you have set up (default is none). This can be used to filter the bait stations when entering records.
- Location: use the Draw Point tool to locate the bait station on the map. Hold and drag to pan around the map. Click on + or - to zoom in and out. If you have a GPS location you can enter that in the Manual coordinates field and then click the "Find using Manual Coordinates field" to add it to the map.
- Notes: enter any other information you want to keep with this bait station (access, location description, etc.)
- Retired: check this box if the bait station is no longer used (or moved to a different area). The bait station will be removed from most displays but historical data will be retained.
Adding Monitoring Stations
Fields for adding a Monitoring station. Required fields are indicated by *
Monitoring Station number/ code*: a reference name for this monitoring station (it doesn't actually have to be a number), this is what will be displayed on the map and can be whatever you wish. If you have a lot of numbered monitoring stations it is useful to add leading zeros to the number (e.g.M001, M002. etc). This will allow you to easily sort them numerically by clicking the column header.
Date installed*: defaults to today's date. This date can be used for maintenance purposes (e.g. you may want to identify monitoring stations older than a certain date for replacement).
Installed by: the name of the person who installed this monitoring station.
Monitoring station type*: select the type of monitoring station from the drop-down list. If your monitoring station type is not listed you can add another term under the project categories on your project main page.
Trap line: select from a list of lines you have set up (default is none). This can be used to filter the monitoring stations when entering records.
(Please note: a trapline is a historical term for a route along which a trapper sets traps, your line does not have to include traps)
Retired: check this box if the monitoring station is no longer used (or moved to a different area). The monitoring station will be removed from most displays but historical data will be retained.
Adding Points of Interest
Fields for adding a Point of Interest. Required fields are indicated by *
Title*: This is what will be displayed on the map and can be whatever you wish.
POI Type: There are three main types of Points of interest, hazard, important vegetation, and signage. You can also add your own terms by selecting project categories on the project main page.
Start Date: defaults to today's date.
End date: In the case of a stream this would be left blank. However, in the case of poison signage, it may have an end date.
Trap line: select from a list of lines you have set up (default is none). This can be used to filter the monitoring stations when entering records.
(Please note: a trapline is a historical term for a route along which a trapper sets traps, your line does not have to include traps)
Tags: Add tags to this installation
Setting up a Bird count monitoring station
After undertaking pest eradication in an area, you will see a decline in catches and bait take, however, another way to see if there has been an improvement is to complete regular bird counts. trap.nz phone app has a bird count function to help you complete this.
A bird count should be held at the same time, date, and season as previously, however, any monitoring that is taking place is good, and will still show changes. The protocol for the 5-minute bird count is here https://www.doc.govt.nz/globalassets/documents/science-and-technical/inventory-monitoring/im-toolbox-birds-incomplete-five-min-counts.pdf
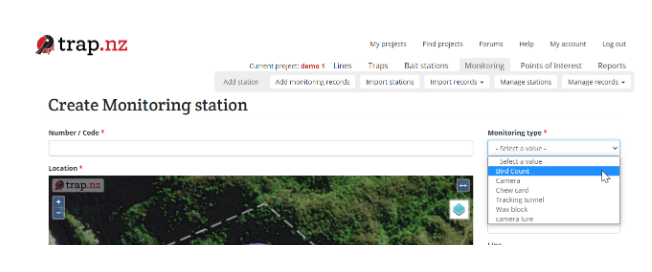
To set up a Bird count station
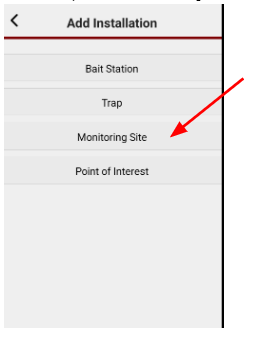
You will need to add a monitoring station either via the phone app or website and select “monitoring type” - bird count.
Setting up a Bird-count station via the website
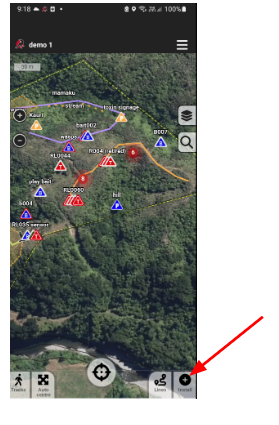
Click the install tab on the bottom right of the map window

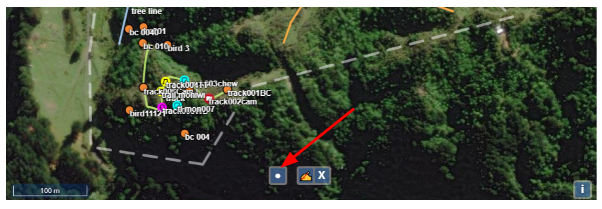
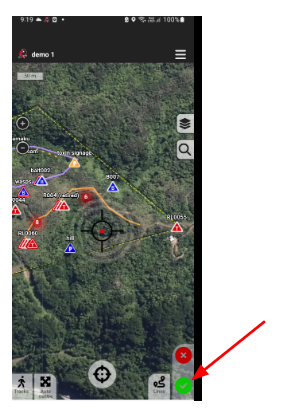
Adding a bird count monitoring station via the trap.nz mobile phone app
Click the install tab on the bottom right of the map window
Click the green tick that has opened up
Select the option of the monitoring station
Complete the code name, open the monitoring type, and select bird count
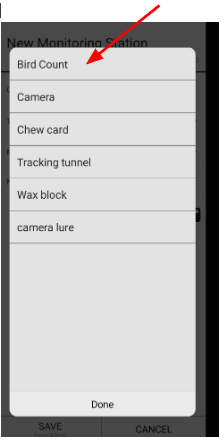
Save your new bird count monitoring station

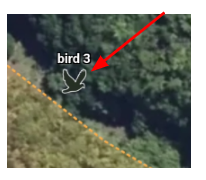
The bird count station will display on the app as a bird
For instructions on how to use the bird count click here https://help.trap.nz/books/trapnz-comprehensive-user-guide/page/bird-count-records
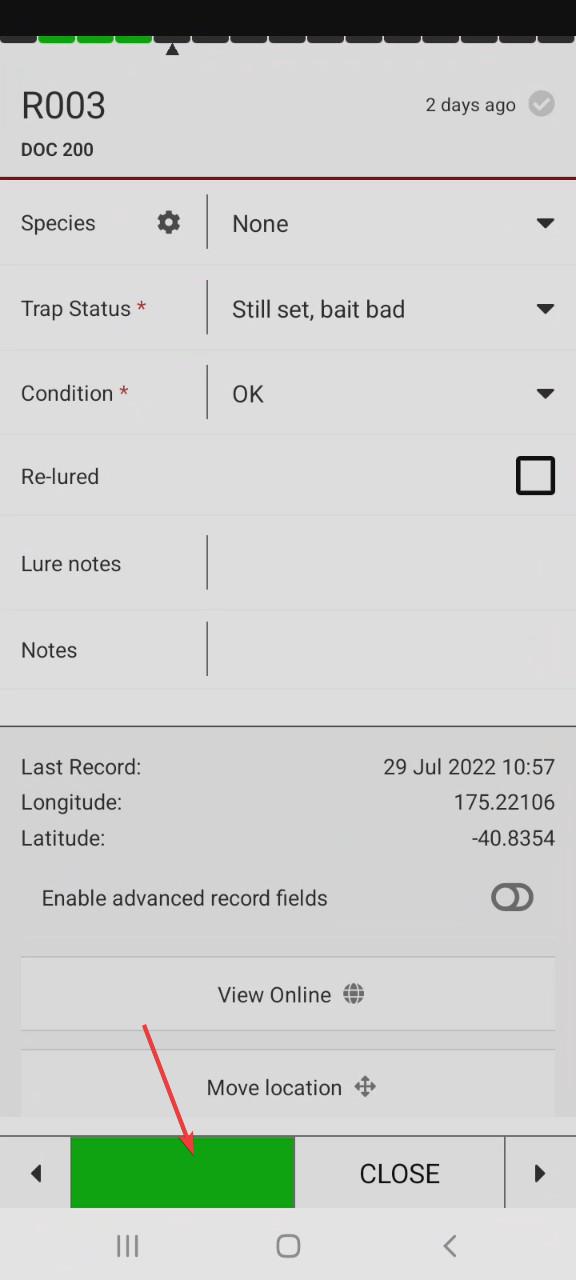
Adding installation records
In order to add a record to an installation, you need to have the correct permissions.
Adding records to a single installation
You can add a record to an installation using the Trap.NZ app. If you wish to add a record using the website:
-
Select the installation you want to add a record to (from one of your project maps, or the lists of installations in the respective sections of your project).
-
If selecting from a map, click first on the icon for the installation, then click on the link that appears in red font.
-
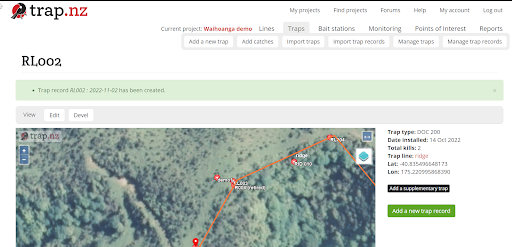
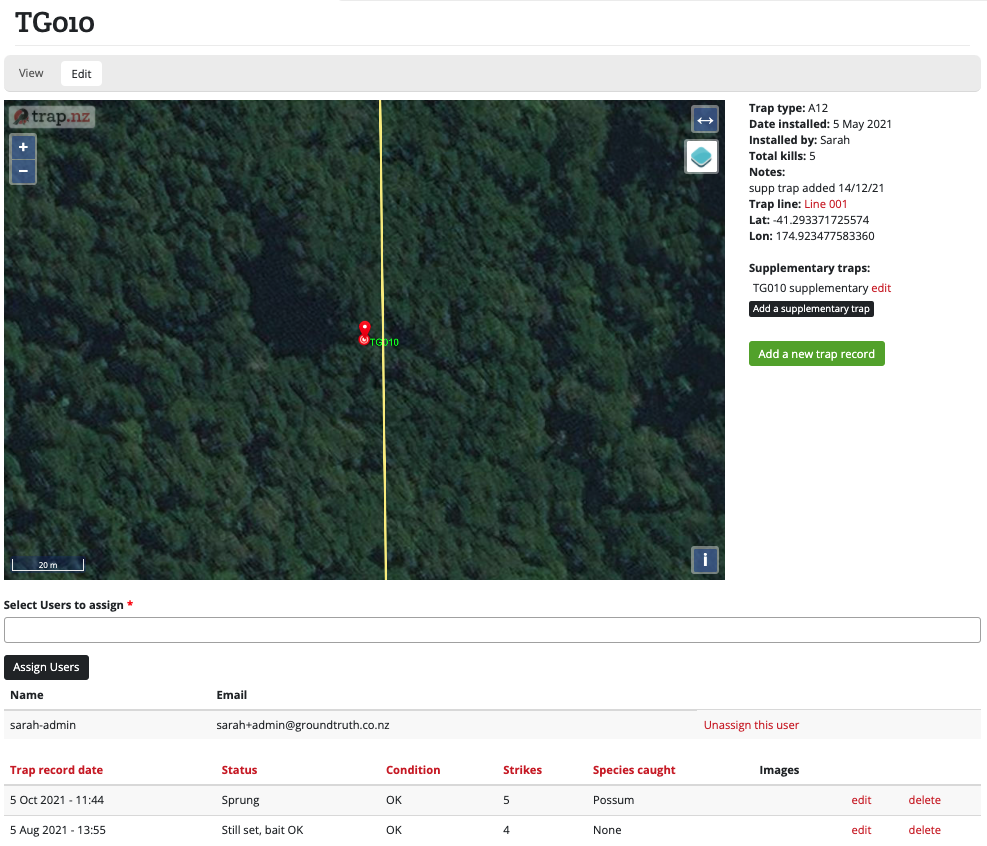
- The page for that installation will load, showing the installation on a map, some information about it, and a table of records (if any) below the map.
e.g.
- Click the green "Add a new (trap/bait station/monitoring) record" button, which will be to the right or below the map, depending on your screen size.
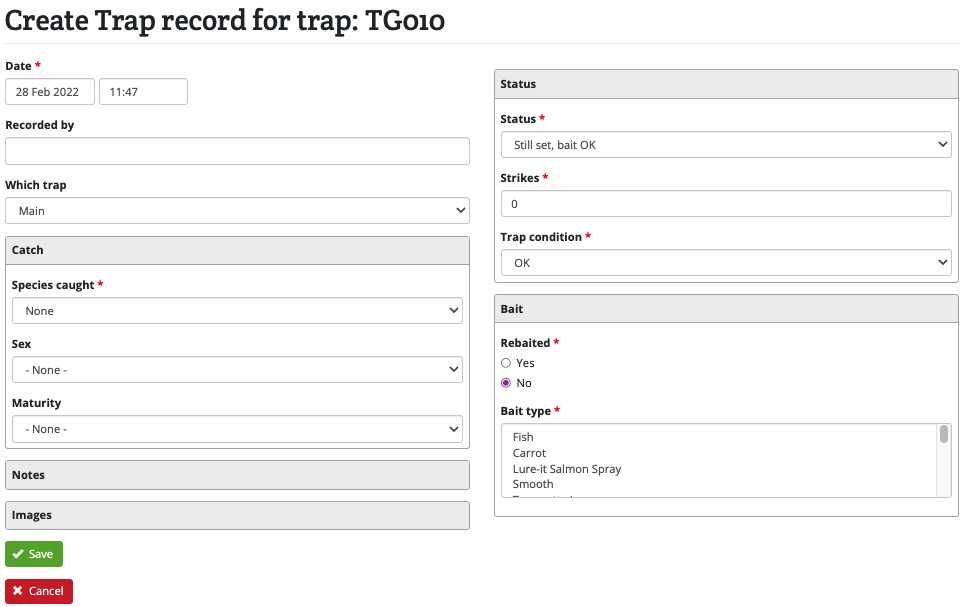
- The form to create a record for that installation will load.
e.g.

-
Enter in the details for this record. The starred fields are mandatory, the other fields are optional.
-
Click the green "Save" button when you are done.
-
The page for the updated installation will be displayed, and the record you created will be shown at the top of the table under the map.
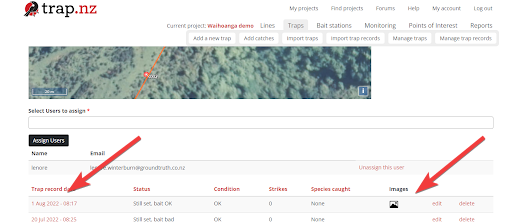
Adding records to multiple installations
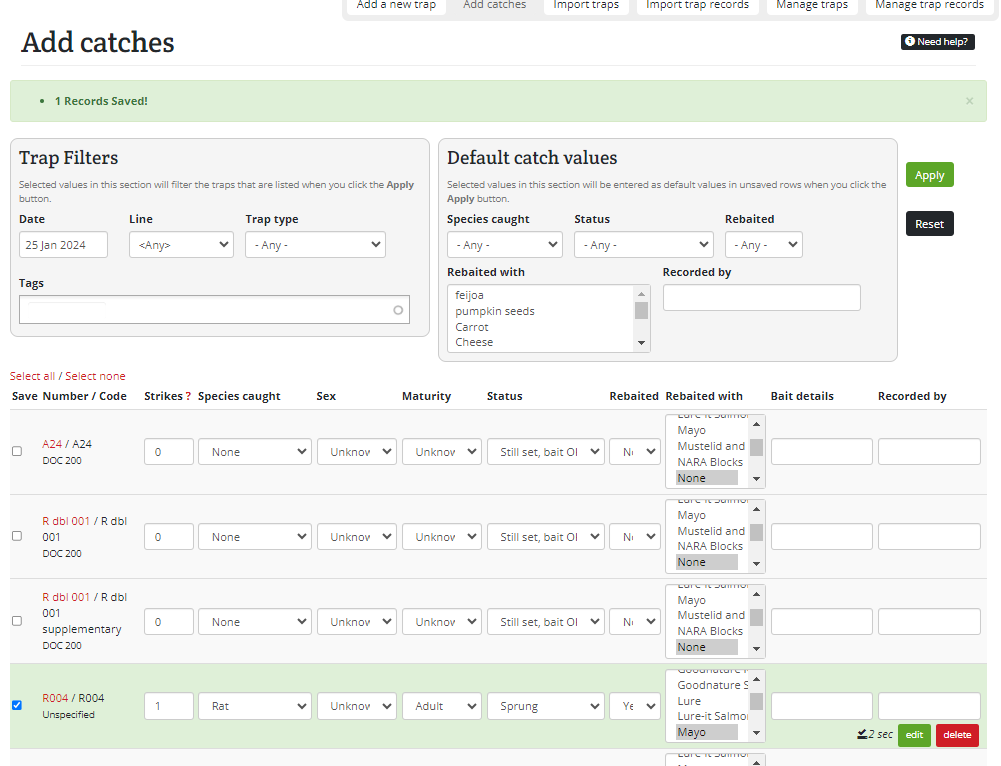
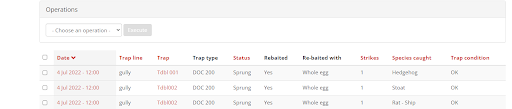
You can use the Add catches page to quickly update multiple traps, as below. This method allows only one record per installation per day, so if you want to add multiple records on one day to an installation, use a different method. Similar instructions will also work for updating multiple stations.
- Set the date for the updates you want to make.
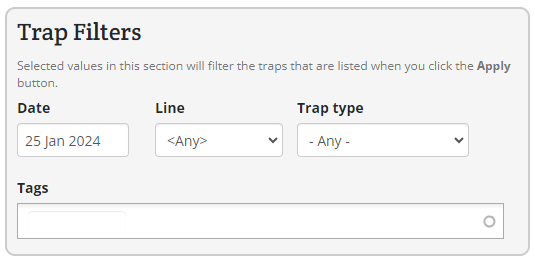
- (optional) If you only want to update some installations in your project, you can filter the installations by specifying a line, tags, or trap type
e.g. only show DOC250 traps on the Southern circuit line

- (optional) In the grey box, you can select default record values.
e.g. all traps caught a rat and were rebaited with cheese

- Click "Apply" and you will see a table appear showing the traps and default information you specified.

- (optional) You can override the default values you set above by editing each installation separately.
e.g. one of the traps didn't catch anything

- (optional) You can deselect the checkbox in the "Save" column of any installation you don't wish to update.
- Check all the information is correct, the click the green "Save" button at the bottom of the page when you're done.

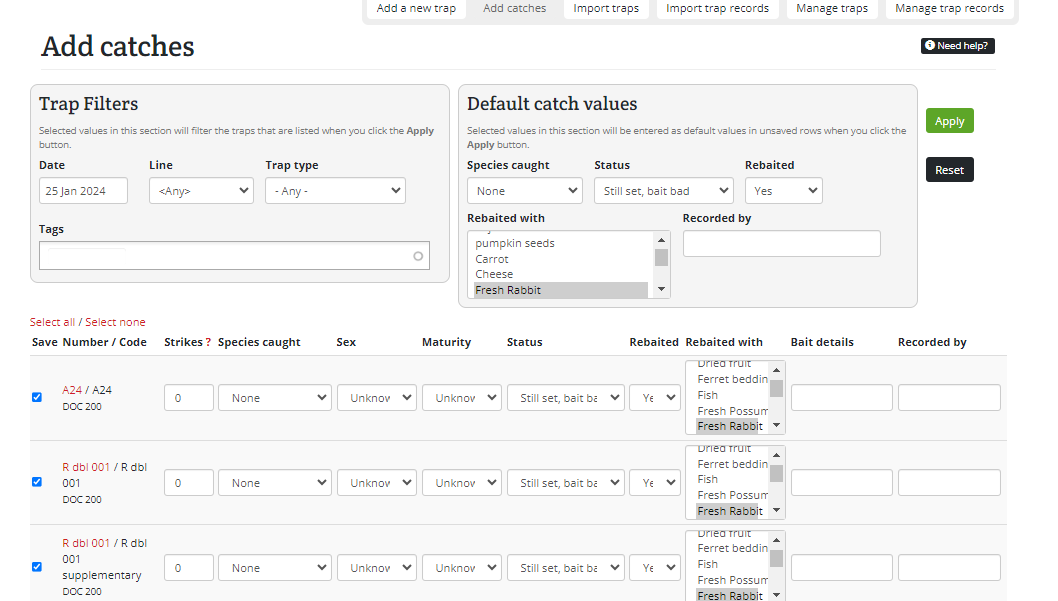
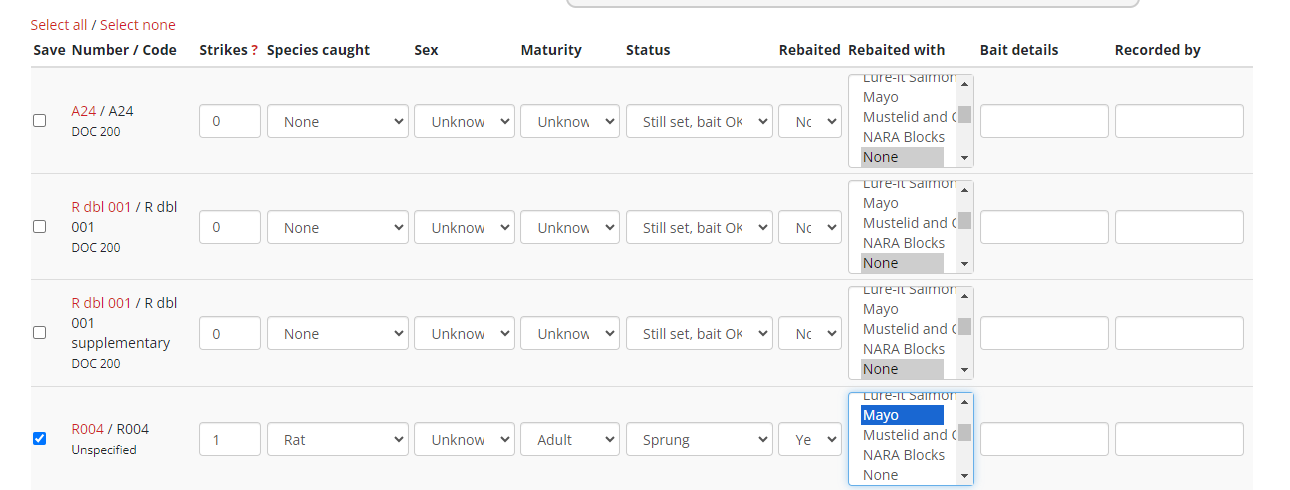

- The rows will turn green to show that the records have been saved for the listed traps.

- If you have made a mistake, you can simply change the values of the appropriate record and click "Save" again. You can also delete individual records or edit them to add more details, such as trap condition or notes.
Adding bait station records
You can use the Add bait station data page to quickly add records to multiple bait stations.
- Apply a filter to select the bait stations you want to enter records for. Mostly you will be filtering by line, but you can also select individual bait stations by entering the first characters of the bait station number or code. By default the filter is set to show active bait stations only - use the dropdown to select retired bait stations.
- Set the date and time to be logged with each record you add. You will need to press the Apply date button whenever you change the date.
- For each bait station, put in the appropriate details and press the Save button.
The first time you add a record you will need to fill in all details. Put in 0 for Bait remaining and Bait removed. For subsequent records these details will be inserted automatically based on the previous record.
For the Active ingredient, Target species, and Formulation fields, a list of predefined values will be displayed once you start typing. Please select values from the list if possible.
Each row in the table shows the last record added (if there are any). You can click the edit button alongside the record to edit the full bait station record. You can edit or delete a record you've just added this way, or you can add notes to the record. The bait station row will turn green when a record has been recently added so that you keep track of where you are up to.
Adding Monitoring station records
You can use the page, Add monitoring station records to quickly add records to multiple monitoring stations.
- Apply a filter to select the monitoring stations you want to enter records for. Mostly you will be filtering by line, but you can also select individual monitoring stations by entering the first characters of the monitoring station number or code.
- Set the start and end date to be logged with each record you add. You will need to press the Apply date button whenever you change the date.
- For each monitoring station, put in the appropriate details and press the Save button.
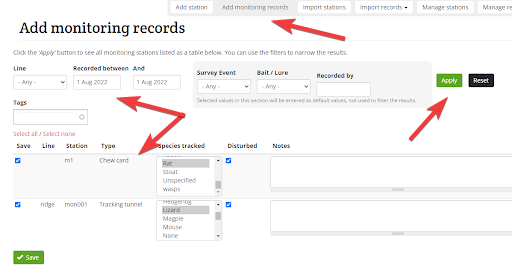
- Check all the information is correct, then click the green "Save" button at the bottom of the page when you're done.
- The rows will turn green to show that the records have been saved for the listed monitoring stations.
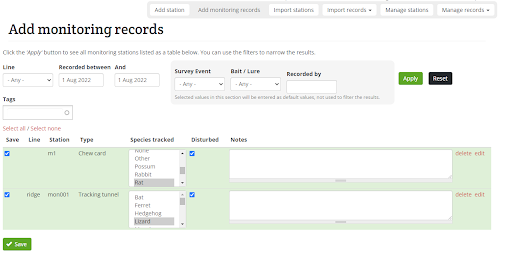
6. The records will now show the changes you have made.
Creating and Opening images taken using the trap.NZ App camera
This is helpful to projects wanting a visual reference of installations or their surrounds
Projects may use images for many reasons, to show points of interest, signage, vandalism, or catches, the options are endless. The trap.NZ App allows you to create an image for your records, that can be referred to at a later date.
1. To create an image, use the individual installations recording page to find the camera icon and capture an image

2. Your image will display for you to review
3. SAVE AND HOLD to save the image to your records
Using the trap.NZ website select the installation you have saved the image to and open the records for it.
4. After selecting the installation you will see the pic icon, click on this to open the recorded image
Camera trap recording and reporting including AI
Projects using motion-triggered cameras (‘camera traps’) can use the Trap.NZ’s camera trap functions to load and tag images, optionally using image recognition software (AI, artificial intelligence) for assist in detecting species.
In order to load and tag images, you will need to create a monitoring station with a type “Camera” for each of your camera traps. A Camera station will have a button to allow the uploading of images.
The new AI identification option allows members to upload and tag captured images to your trap.nz project easily.
1. Select the camera on your trap.nz project you are wanting to add images to.
2. Open the installation and select upload images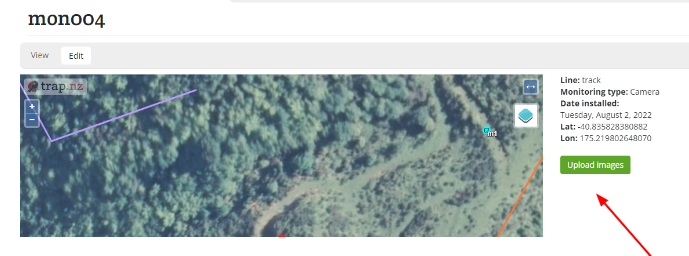
3. You will be prompted to drag and drop your files into the trap.nz page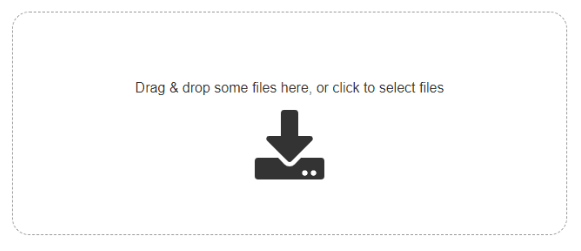
4. Your images will display ready for uploading. If the date/time shown is incorrect you can alter these settings here

Note: the programme will detect any duplicate images ensuring you don’t accidentally load them twice
5. The images have all loaded successfully when the 100% appears in the bottom left corner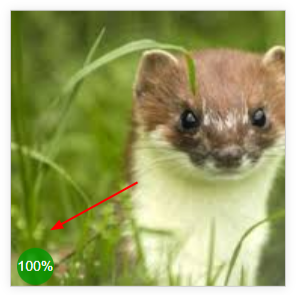
6. You can now choose to match with the AI and select return, be patient as this can take some time depending on the quantity being processed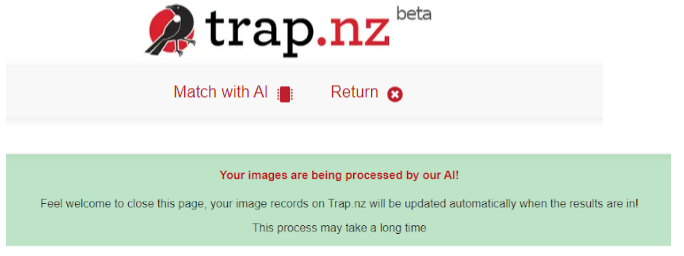
6. If you choose to match it with the Artificial intelligence software, the chip icon appears when it has matched.
You can exit the page while it is being processed without fear of loosing your records or having to start again.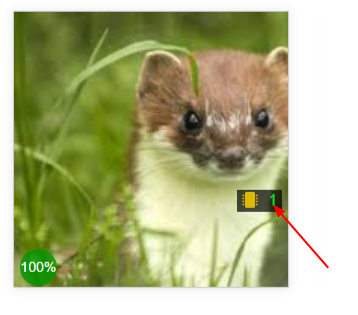
7. You will be redirected to the camera installation page, the records are displayed under the map, and you can now tag/ review species in the image set.
8. You can either use the mouse or the keyboard arrow keys to navigate the images. This allows you to easily edit the results
Sometimes the AI gets it right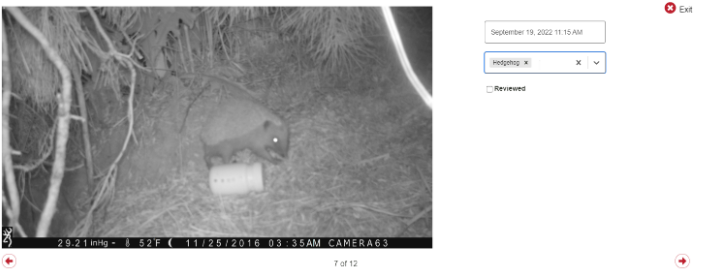
Sometimes the AI gets it wrong, you can edit the details by selecting the correct species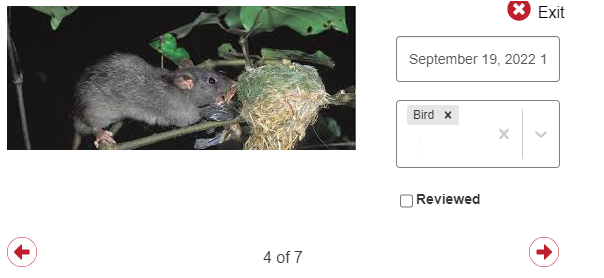
9. To run reports from the Camera images, select the monitoring tab, manage records, manage camera images, and select the filters you would like to use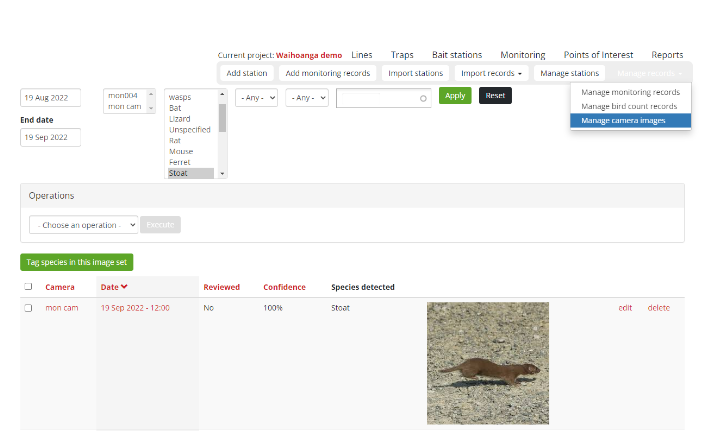
Reports can be exported using csv found at the bottom of the report page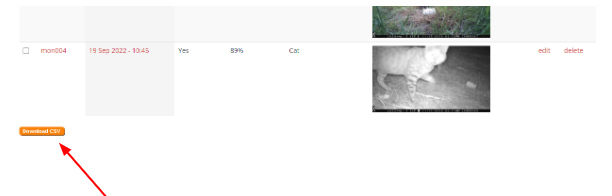
Please note: the Camera AI has been updated to identify a larger number of species. These now include:
Bird
Cat
Deer
Dog
Ferret
Goat
Hedgehog
Kiwi
Lagomorph (rabbits and hares)
Livestock
Pig
Possum
Rodent (rats and mice)
Stoat
Wallaby
To add the new species to the monitoring of your trap.nz project go to the project categories
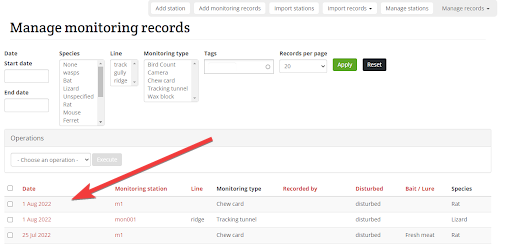
Deleting installation records
- View all of the relevant installations by going to "Traps", "Bait stations", "Monitoring" or "Point of interest" from the project menu.
- Select the installation that you wish to delete records from. You should be able to see the name of the installation, a map of its location, and under the map, all the records associated with it.
- Find the record that you wish to delete from the table below the map, and click the red "delete" button at the end of the row.
- Click the red "Delete" button on the confirmation page to delete the record.

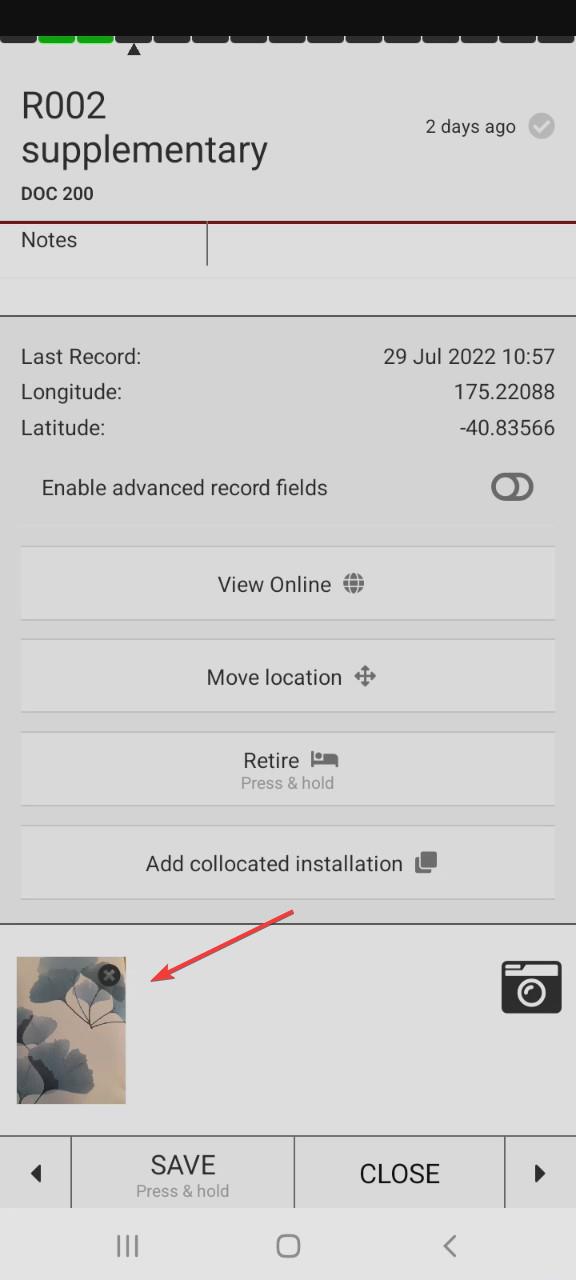
Adding supplementary traps
Note: It is likely that all supplementary traps will be converted to collocated traps in the future as this allows for more flexibilty, so we recommend people create collocated traps, rather than supplementary traps.
A supplementary trap is an additional trap that is part of the same physical set as another trap. It is most commonly used for double trap sets - for example if you are installing a tunnel with two DOC 200 traps inside it. In this case you would add a trap as normal (recording the type, line, location, etc). And then you would add a supplementary trap of the same type to it. You can then record data (trap checks and catches) separately for each side of the trap. However, the two traps remain tied together and the information such as line, location, etc., remains the same for both.
When you add a trap via the website, you can specify that it is a double trap, and this will automatically create a supplementary trap of the same type. It will have the same code with the text "supplementary" appended to it.
Another example is a rat tunnel with a mouse trap included in it. You can add the mouse trap as a supplementary trap and it will remain linked to that set.
Note: you can't add supplementary traps via the App, but you can add "collocated traps".
To add a supplementary trap:
Select the trap, and then click on the Add a supplementary trap button.
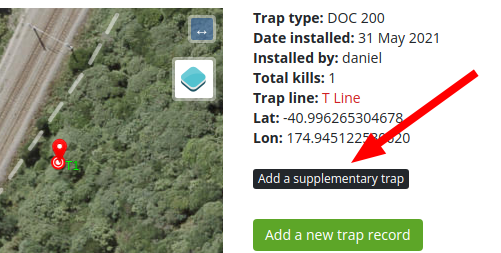
Required fields are indicated by *
Name*: the trap code or reference for this supplementary trap. This is usually displayed in brackets after the name of the parent trap in listings and reports.
Trap type*: select the trap type from the drop-down list. If the trap type is not listed select "other" and use the Trap sub type field to describe it.
Trap sub type: optionally enter any information, such as modifications.
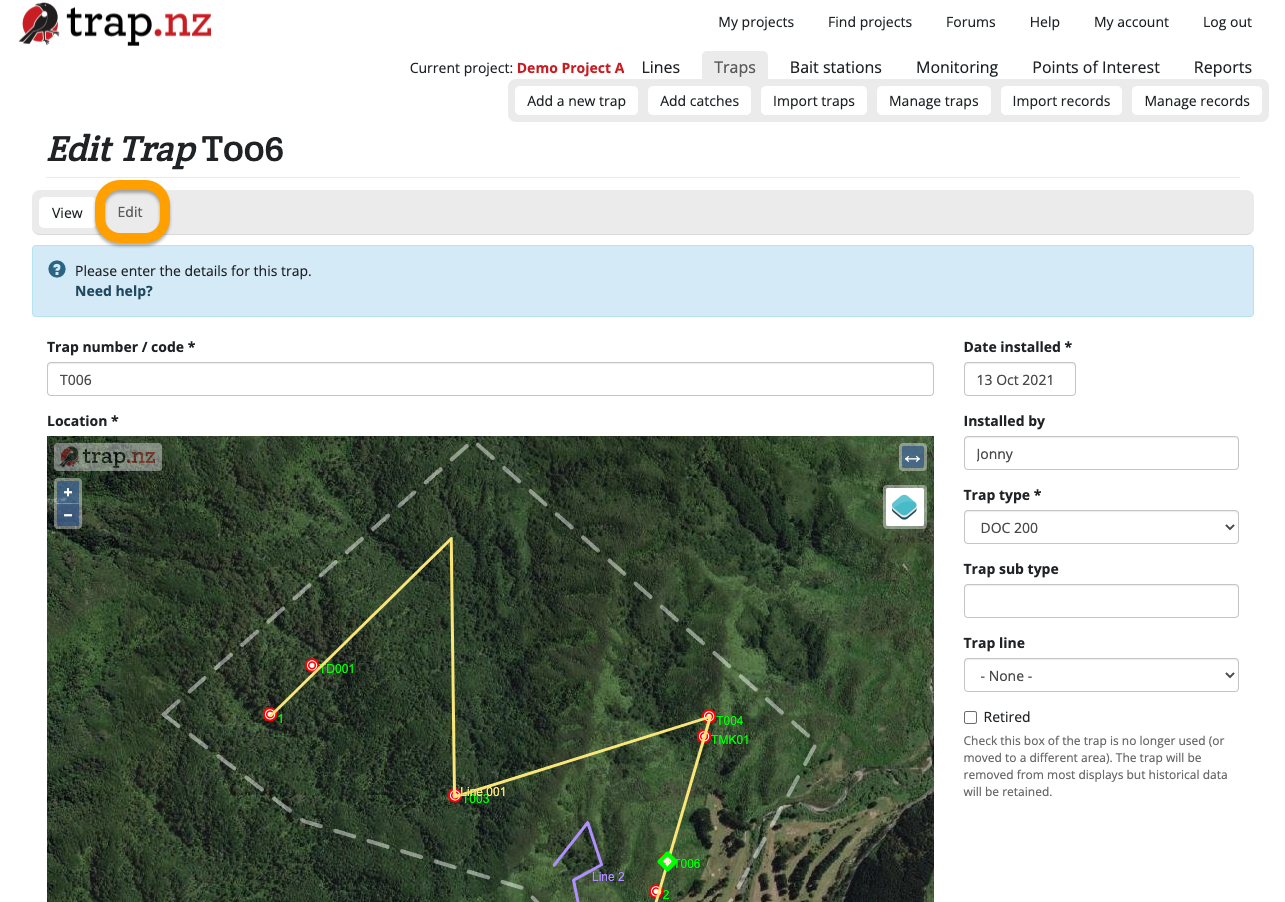
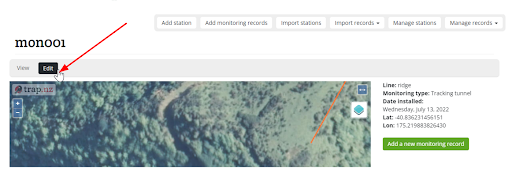
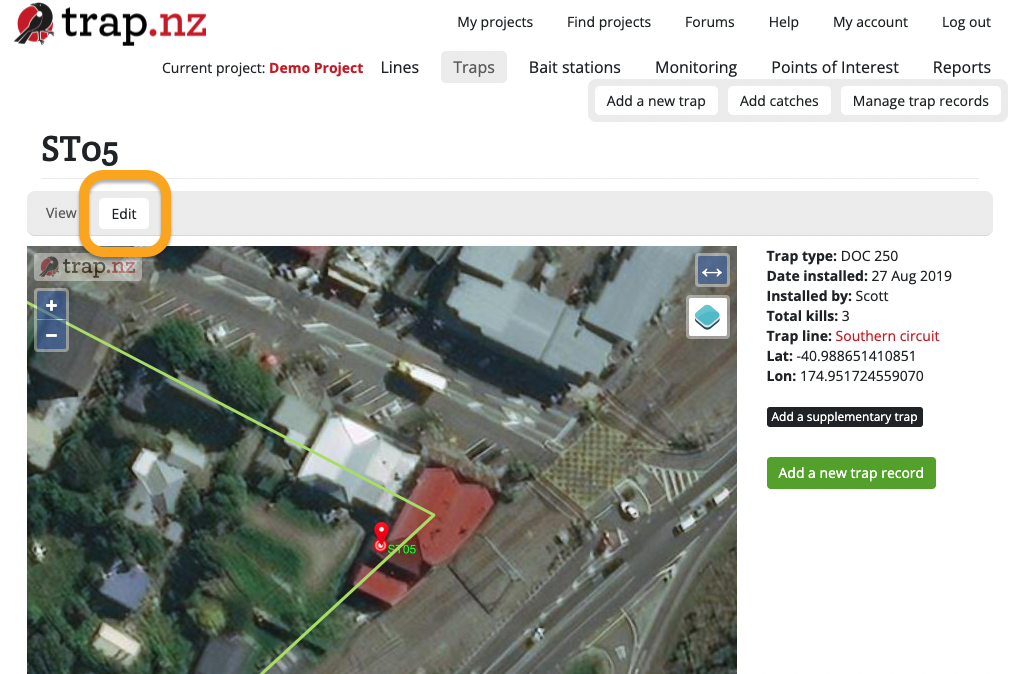
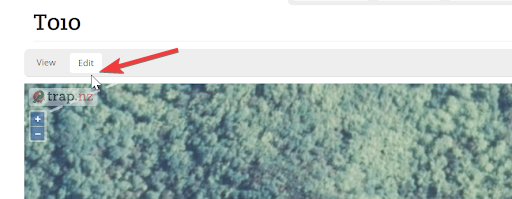
Editing a single installation
The instructions below describe how to edit a single installation. Installations can also be edited in bulk (e.g. when adding many installations to a line).
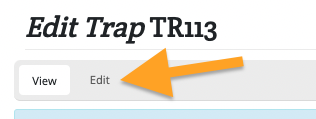
To edit a single installation
-
Select the installation you want to add a record to (from one of your project maps, or the lists of traps/stations in the respective sections of your project). Click on the link that appears in red font, which will load the page for that installation.
- Click the "Edit" button under the name of your installation at the top of the page (see screenshot below)
- When you've edited the installation, click the green "Save" button at the bottom of the page to save your changes.
Retiring an installation via the trap.NZ website
Retiring an installation
Retiring an installation is used when you are no longer wanting an installation in its current position.
When you’re moving an installation it’s important to remember that the records stay with the installation, not the site (unless the installation is being moved a large distance then they will retire to the original site). To ensure that your records correctly report the information for that particular site you should retire them.
The following retire instructions apply for all installation types - Traps, Bait stations, and Monitoring stations. Points of interest have a time expiration so are not included.
Installations can be made active again using the same procedure.
There are two ways to retire an installation via the trap.NZ website
Retiring a single installation
1. On your project page, select the type of installation you are wanting to retire and select show results
2. This will then show all the installations of the type you have selected in this project. Choose the installation you would like to retire
3. This will open the installation page. You can now choose Edit
4. On the Edit page you can now choose to retire the installation
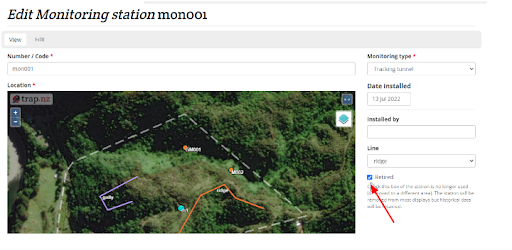
5. Finally save your changes
Retiring multiple installations
1. Choose the type of installations you are wanting to retire and select manage stations this will open the operations box
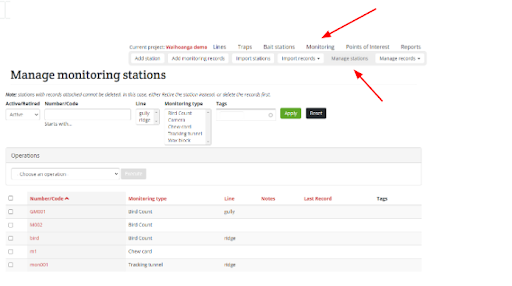
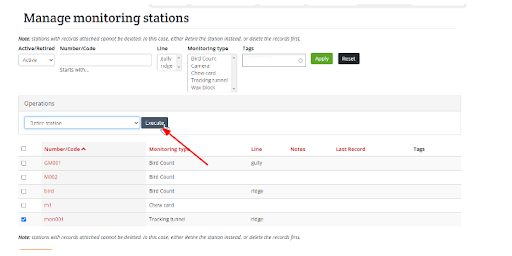
2. Select the installations you are wanting to retire by clicking next to them on the list they will then turn blue with a tick, select the operation retire station

3. Select execute
4. .You will be prompted to confirm your choice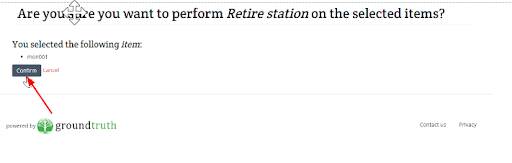
All the installations you have selected to retire are now no longer active
Unretiring a retired installation
There could be many reasons you would want to unretire an installation, a member may have accidentally retired it in the field, you may have retired it for a season, or you may have retired it then realised an installation was still needed in that site.
The instructions for unretiring an installation are the same but for this example, we have used traps
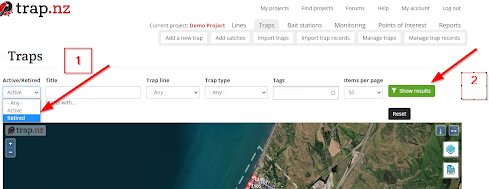
1. On your project page select manage traps
2. A pop-down option of retired or active will become available. Select retired and apply the filter, this will then show all the traps that have been retired.

3. Select the traps you are wanting to unretire, then choose operation - change trap details, press execute.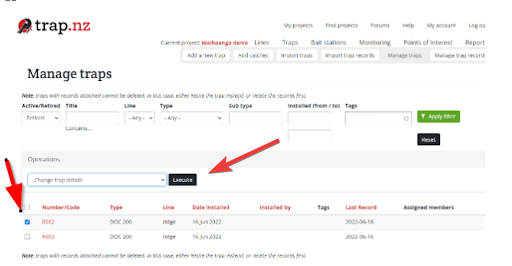
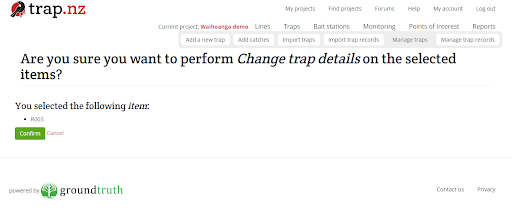
4. You now have a page with a lot of options, choose retire, a second retire box will show do not check it , Next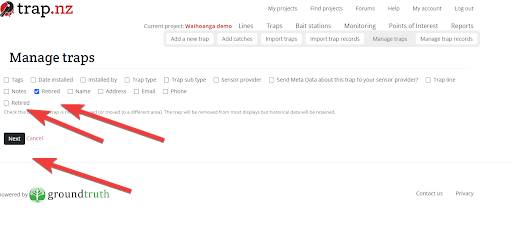
5. It will then prompt you to confirm the details
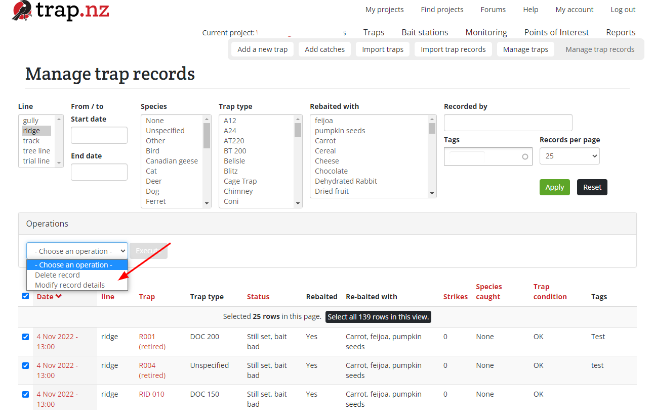
Changing the trap condition to disabled
For traps that require an open or closed status trap.nz has created the disabled condition.
1. Open your project trap page and select Manage trap records
- Select the trap lines you want to disable and select apply
3. Select the traps you want to disable and select the operation modify records - execute
4. Tick the box "trap condition"

5. This will open up a drop-down box where you can choose disabled
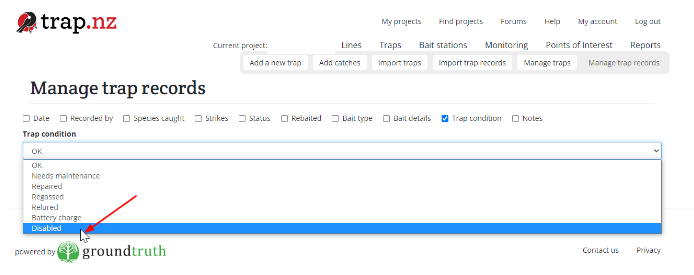
6. To reset all the traps repeat the steps above and select ok
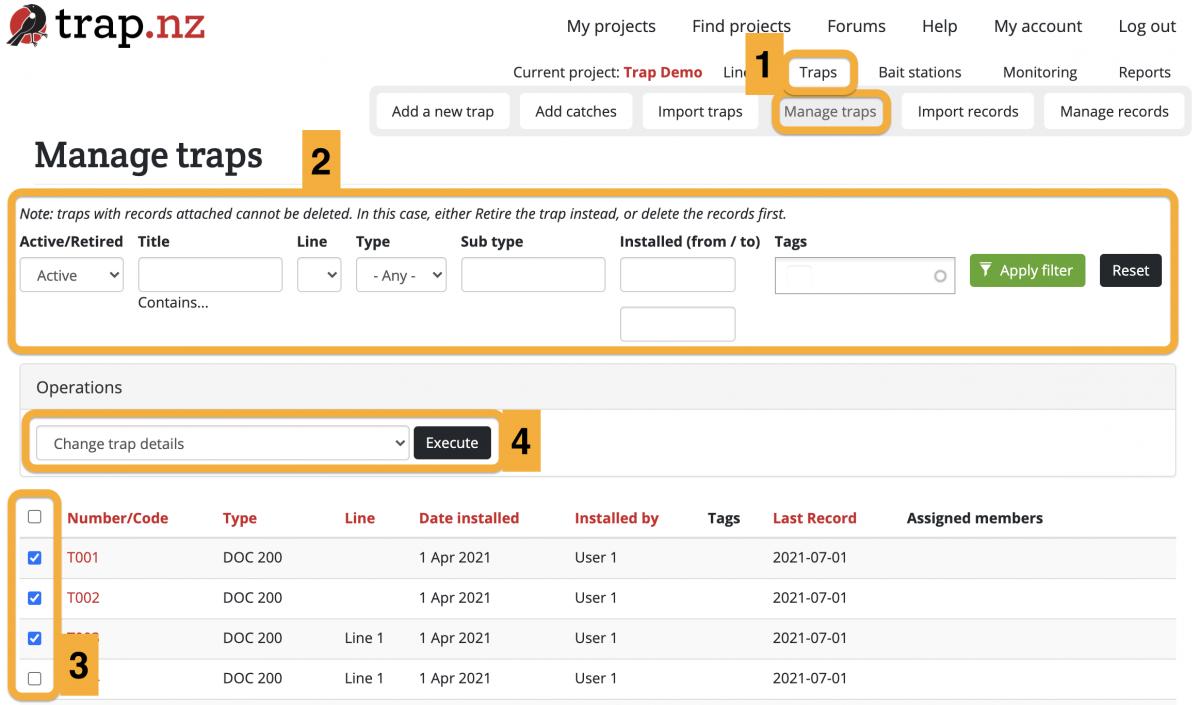
Bulk editing installations
Only users with an "Administrator" role in a project can access these tools.
The instructions below are for bulk editing traps. The same method can be used to bulk edit stations, just replace the word "trap" with "bait station" or "monitoring station" as needed.
To bulk edit traps:
- Go to the Manage Traps section of your project (If you have more than one project, check that you're in the right one). You can get there via Traps > Manage Traps in your project menu.
- (Optional) If you have a lot of traps, you can search for the particular traps that you want to edit using the filter bar. Click the green "Apply filter" button to show the filtered traps.
- Select the checkboxes of the traps you want to edit.
- Choose an operation from the Operations dropdown menu, then click the "Execute" button.
- From here you will be guided to edit the selected traps in whatever way you have selected.
- Check your edits and click the green "Confirm" button to save your changes.
For video help, click the youtube link here https://youtu.be/g4bkmiPNlqs
Bulk editing operations include:
- Add / remove tags
- Assign / unassign members to traps & stations
- Delete traps & stations
- Change trap & station details
- Date installed
- Installed by
- Type
- Sub type
- Line
- Retired
- Trap sensor provider
- Send Meta Data about this trap to your sensor provider?
- Trap notes
- Move selected traps & stations to another project
- Remove sensors from traps
- Retire traps
- Modify members' sensor notifications subscriptions
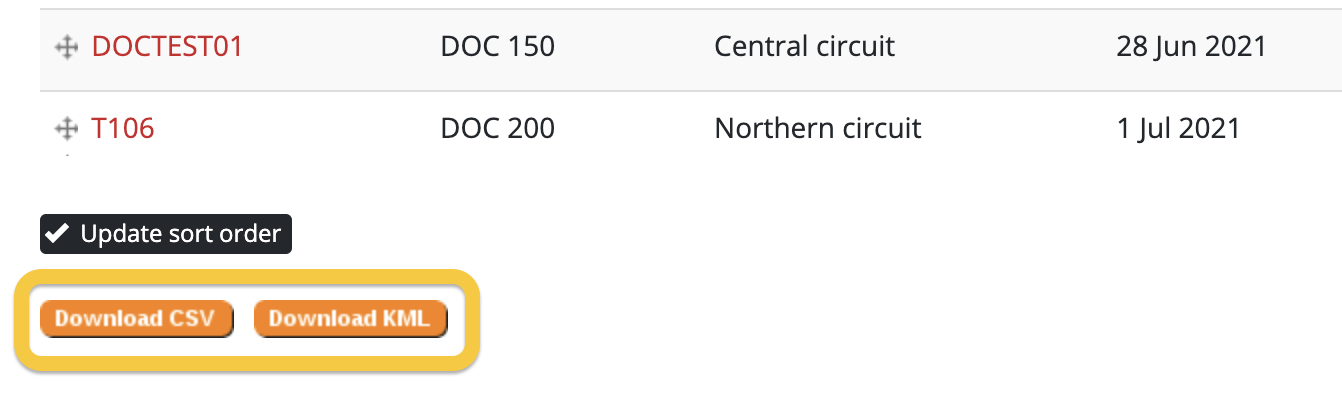
Downloading installation information
Installation data (including name, type, location etc.) can be downloaded to a CSV or KML file. CSV files are most commonly used - they can be viewed and edited easily in spreadsheet programs like Excel or Google Sheets. KML files are useful if you want to open the data in ArcGis Explorer or Google Earth.
Downloading installation record data is a different process.
To download installation information:
- Navigate to the Traps, Bait Stations, or Monitoring Stations section of your project.
- (Optional) Apply any filters using the filter bar (e.g. filter by line). The downloaded file will respect your current filters for that overview page

- Click the "Show results" button to populate the table below the map.
- Scroll down to the bottom of the page and click the "Download CSV" button to download a CSV file, or the "Download KML" button to download a KML file.

- When prompted, select a location on your device to save the file.
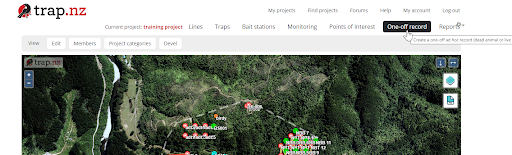
Adding one-off records
A one-off record does not need to have a permanent location attached to it.
You may want to add one-off catches for various reasons, from shooting to road kill and predation.
To add a one-off record on the website
1. Click the One-off record tab.

2. This will open the one-off pest form, where you can add the information needed to record your catch.
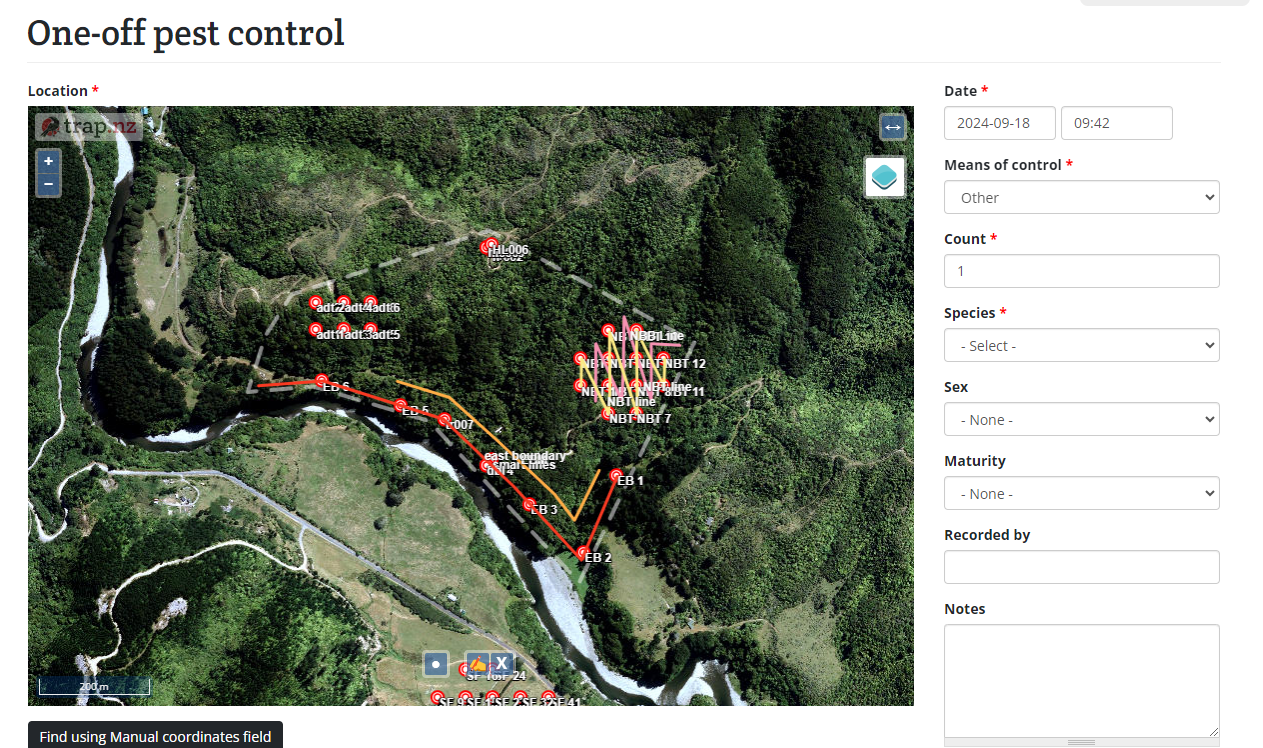
3. Select the “draw a point “ button to add a location.

4. Don’t forget to save to catches.
You will currently find your records in the trap records tab and reporting.
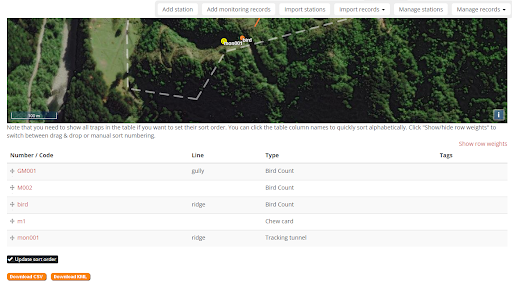
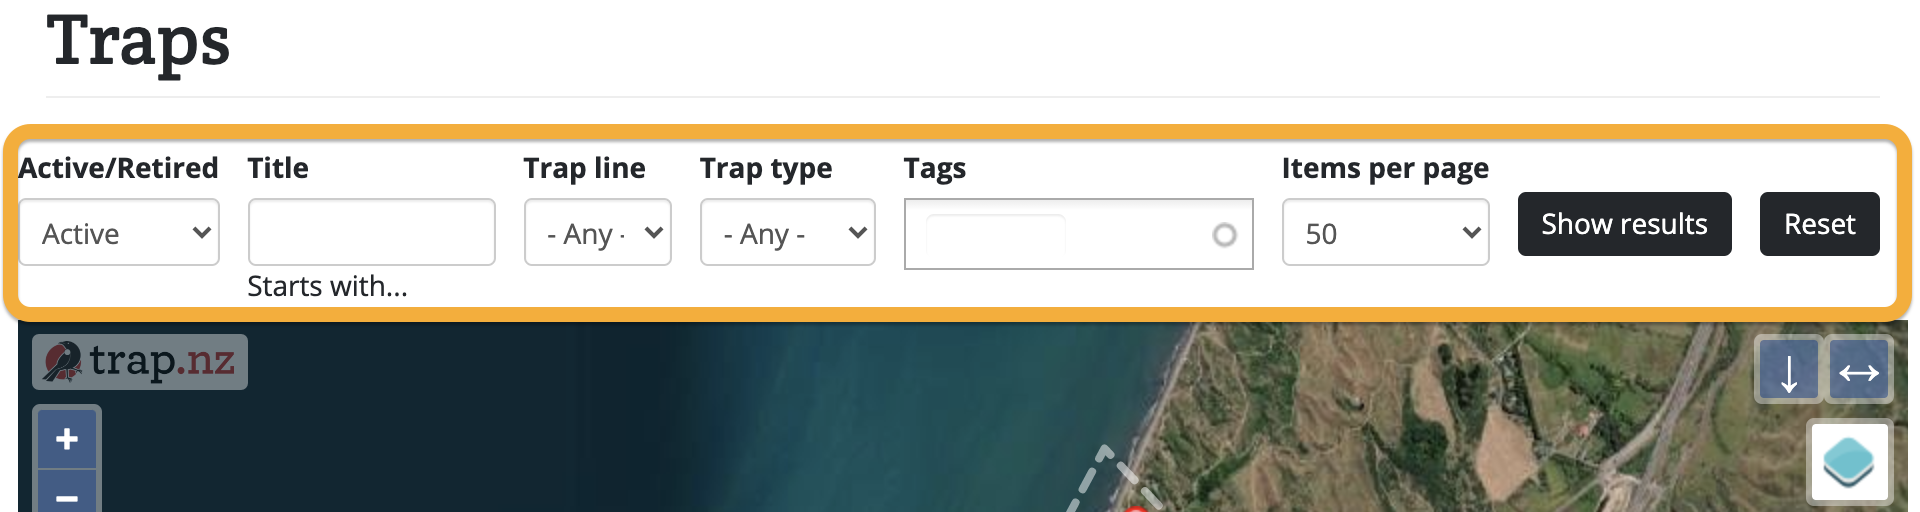
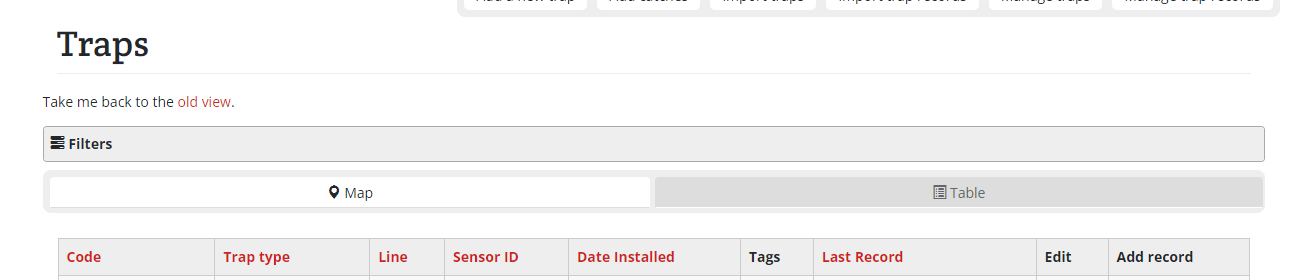
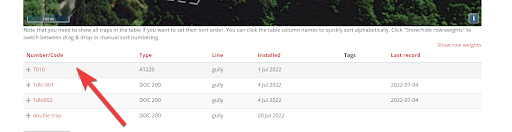
Sorting installations
On the Traps, Bait Stations, or Monitoring Stations section of your project, you can sort the order in which your installations appear in the table underneath the map (once you've clicked the "Show results" button). Clicking on a column heading will sort them by that column. Click the heading again to reverse the sort order.
Custom sort order
You can also manually sort the order in which installations are listed in the table.
Please note that with the new trap overview page you will still temporarily have to use the "old view" found under the "traps" heading to gain access to the ability to sort
- Click and hold the handle to the left of its Number/Code to drag it up or down.
- When you are done sorting, click the "Update sort order" button at the bottom of the table to save it.

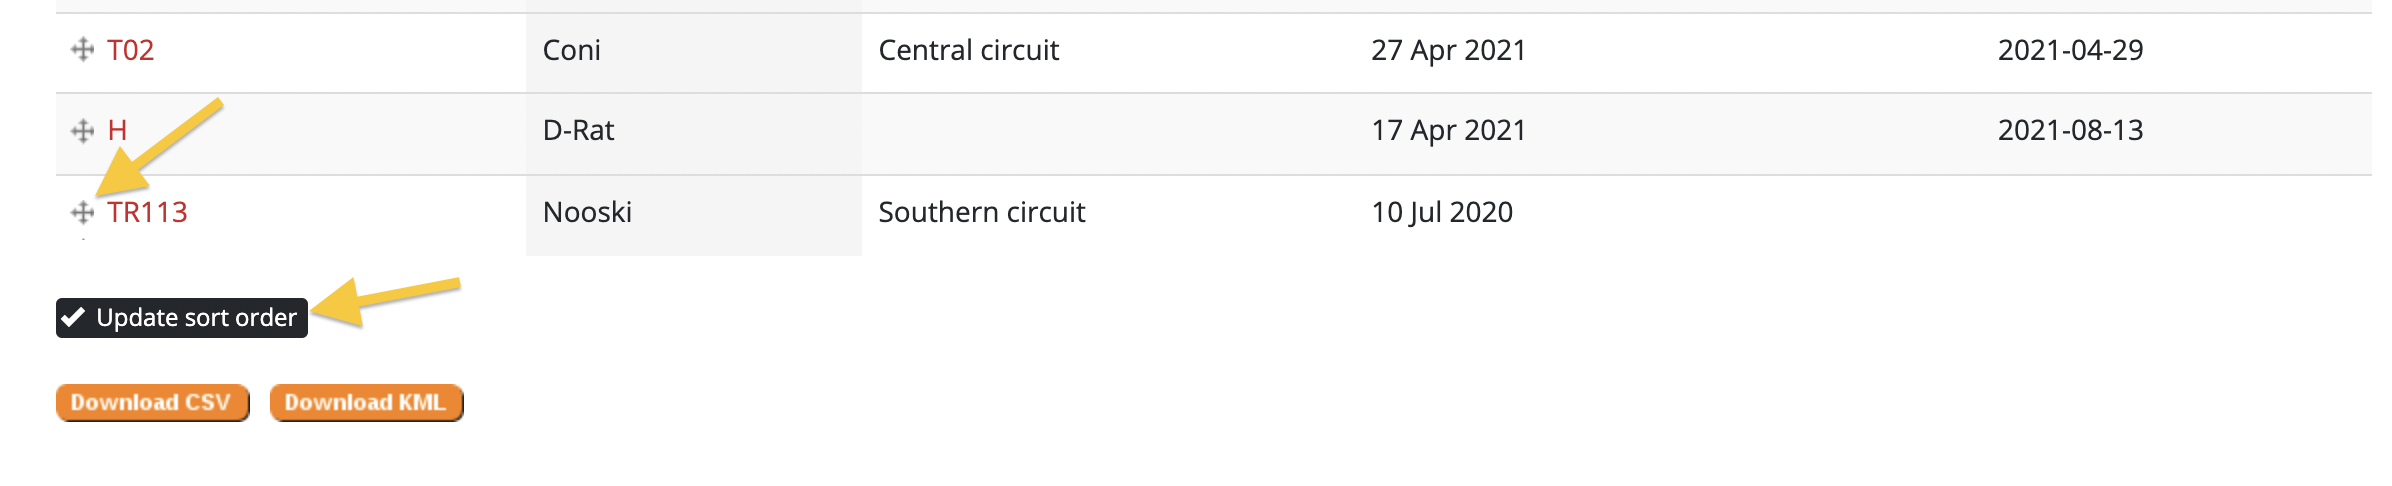
Sorting all installations in a line
You might want to make the order in which installations are listed on a line match the order in which you check them. If you use the mobile app to enter installation records (recommended), this can make recording data in the field more efficient.
Before you can sort your installations, you need to make sure that you are viewing all the installations for a line. To do this, use the filter options at the top of the page.
- Navigate to the Traps, Bait Stations, or Monitoring Stations section of your project.
- Select the line you want to sort from the "Line" dropdown in the filter bar.
- Select "- All -" from the "Items per page" dropdown.
- Click "Show results"

- You can now manually sort your installations into whatever order you like. Click the handle to the left of its Number/Code, and drag it up or down
- When you are done sorting, click the "Update sort order" button so that your hard work is saved!

Moving installations
See also: Moving installations using the app
- been the one who added the installation to the project, or
- a Manager or Administrator role in the project
For video help, click the youtube link here https://youtu.be/244cp2wbmSk
Moving an installation that already has records associated with it
If you are physically moving an installation that already has records associated with it, best practice is to “retire” the installation and create a new one in the new location. This keeps old records correctly associated with the old location.Moving an installation that has been incorrectly located on the project map
- Select the installation you want to relocate from either a list of installations, or by clicking on it on a map

- The page for that installation will load
- Click the "Edit" button

- The "Edit installation" page will load
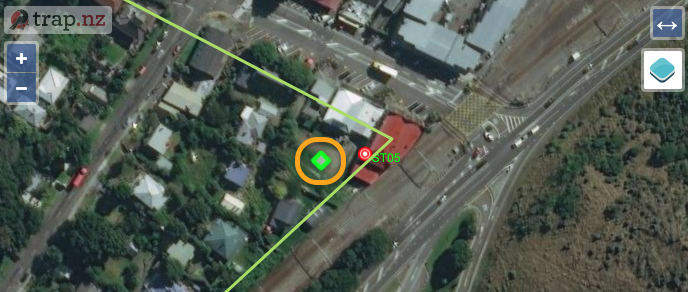
- Zoom in on the trap on the map, so that its current location and the location you want to move it to, are both visible.

- Click the "Draw a point" icon on the map
- Click on the new location for this installation on the map
- A dialog box will appear, asking you to confirm that you want to move the installation's location on the map
- Click "OK" to confirm
- The map will now show a green square where the installation will be moved to

- Click the green "Save" button at the bottom of the page to save your changes
- The page for that installation will load, showing the installation at the new location on the map

Moving installations between projects
The instructions below outline how to move traps between projects. The process is basically the same for moving bait stations and monitoring stations, just replace the word "trap" with "bait station" or "monitoring station". You can also move lines and POIs in the same way.
Here is the link to the video instructions https://www.youtube.com/watch?v=IJUXDc0Gmhw
Installations can be moved between projects only by a user who is an administrator of both projects.
Moving traps between projects
-
From the "My projects" page, select the project you want to move traps away from
-
Click on the "Traps" section
-
Click on "Manage traps"
-
Select the checkboxes for the traps you want to move to another project
-
Select "Move selected traps to another project" from the dropdown "Operations" menu
-
Click the "Execute" button
-
Select the "Target project" (the project you want to move the traps to) from the dropdown menu
-
Click the "Next" button
-
Check the list of traps to move, and click "Confirm" to move them to the new project
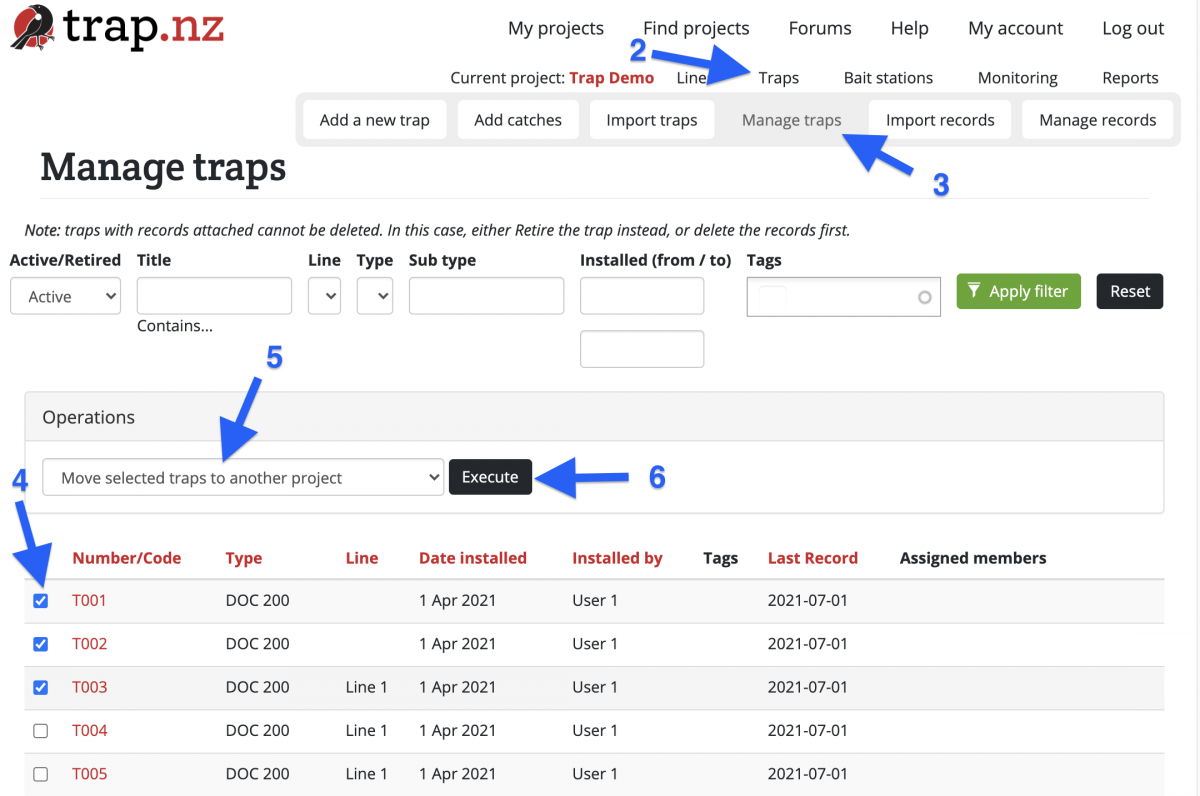
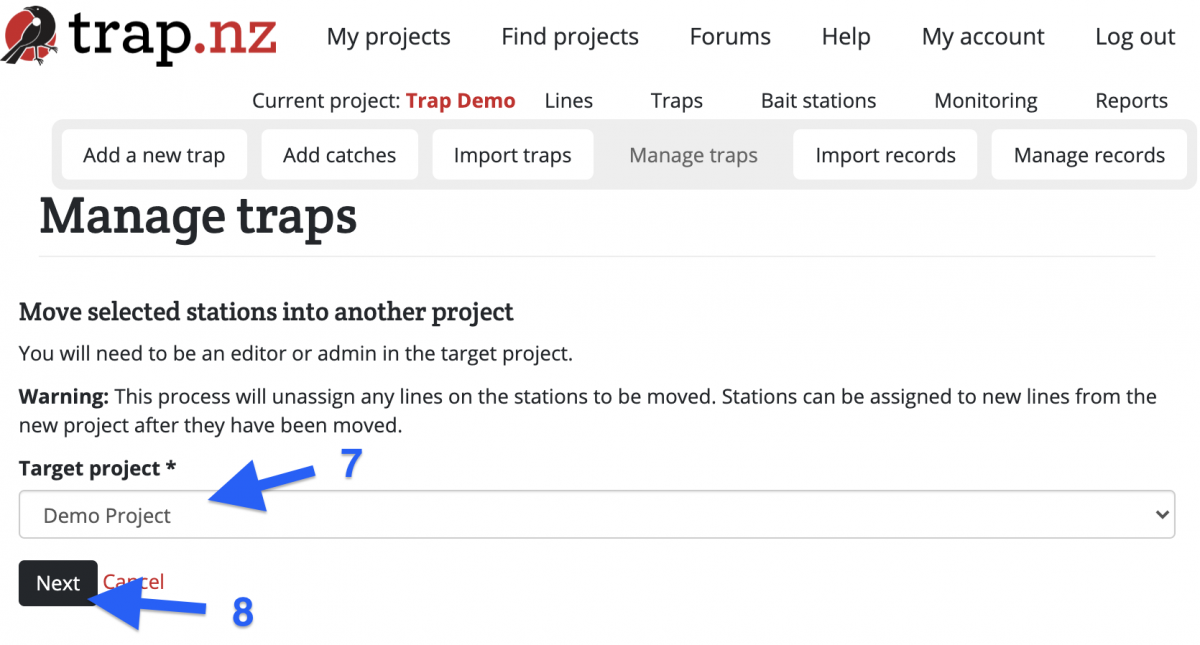
Please note, when you move the installations the lines do not move with them these have to be moved separately. If you import the installations to the new project via a csv file, the records attached to the installations will not transfer to the new project.
Deleting installations
An installation can only be deleted if there are no records associated with it.
If you wish to delete an installation which has records associated with it, you have two options. You can either:
- delete all the installation records before deleting the installation, or
- retire the installation (which means it will not be visible in your project, but you can still run reports that include it)
If you wish to delete multiple installations at once, you can do this by bulk editing installations.
To delete an installation:
- Select the installation you wish to delete (you can do this from your main project page or from the "Traps", "Bait stations" or "Monitoring" sections of your project). You should be able to see the name of the installation, and a map of its location.
- Click on the "Edit" button near the top of the page
- Scroll down to the bottom of the page and click the red "Delete" button
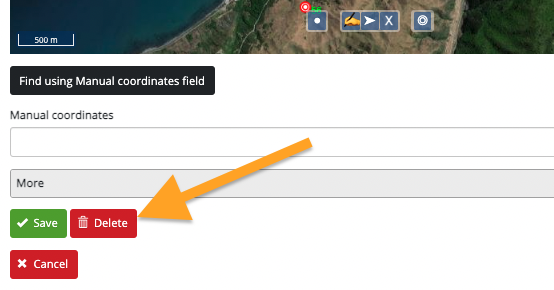
- Click the red "Delete" button on the next page to confirm deletion of this installation.
Deleting Supplementary traps
Supplementary traps are essentially double traps, therefore when making the decision to delete a supplementary trap you need to consider the following options.
- Delete the supplementary trap. You will first have to delete the records associated with the supplementary trap, no longer making them available for any historic data
- Remove the double trap, retiring it as above then replace it with a single installation to continue to collect records from that site, and still have the original installation records available for historical data
- Remove the double trap entirely and retire the installation. This will keep the records for this installation with the site.
Deleting a supplementary trap is completed on the trap.NZ website
Select Manage trap records on your trap.NZ project page
Bring up the installations you are wanting to delete and tick the ones you ware wanting to remove
Select operations, delete records, and execute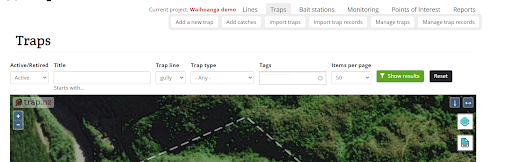

You will be prompted to ensure you are wanting to confirm this move

It will now show the records deleted
Deleting the installations
On the project page, select traps and filter to open up the installations you are wanting to delete.

Select the installation to be deleted.
Click the edit tab
This will open up the option to delete the installation at the bottom of the screen.
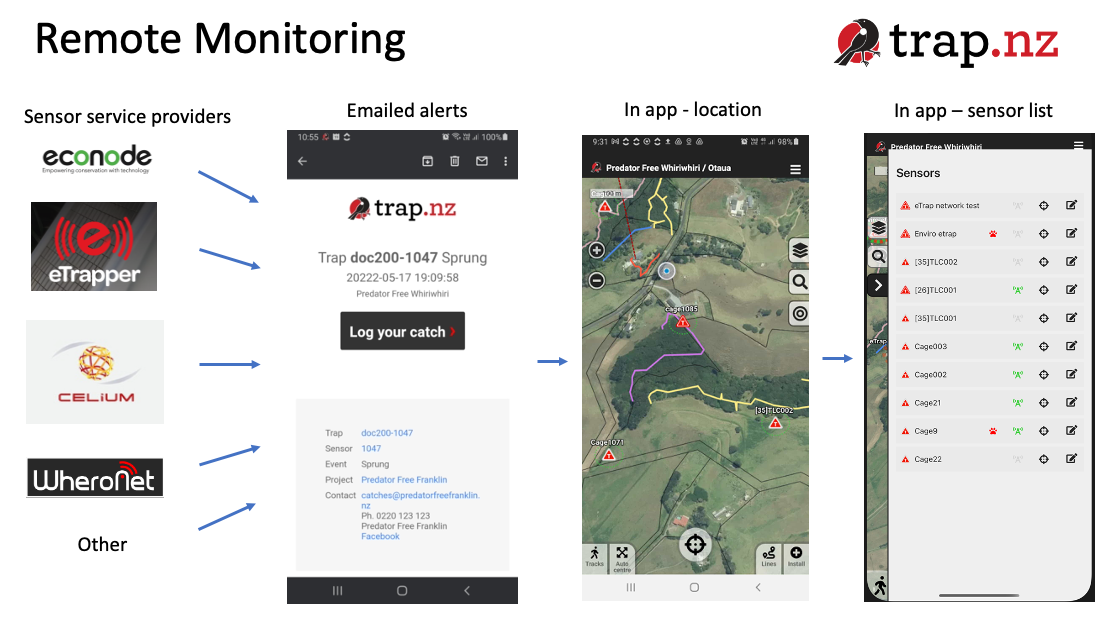
Remote monitoring traps with sensor technology
Trap.nz enables trappers to remotely monitor devices (traps, bait stations etc) using sensors from a growing number of providers. For the trapper on the ground this means a heads up of sensors events in the app, and opt-in notifications via the app and email.
For project coordinators it offers an overview of all sensor devices across one or more projects. This provides not only trap status, but also early incursion warning, accountability for funders, and the social benefits of knowing when to start the kōrero with trappers.
All sensor statuses are viewable in the Trap.nz sensor reports - all your sensor providers data in one place.
Please contact us to become a sensor service provider.
How it works
In New Zealand, it is a legal requirement under the Animal Welfare Act 1999 that all live capture traps must be checked within 24 hours. Breaches are punishable by up to 12 months imprisonment and a fine of up to $50,000 for an individual or $250,000 for a body corporate.
Trap.nz enables trappers to remotely monitor devices (traps, bait stations, etc.) using sensors from a growing number of providers. For the trapper on the ground, this means a heads-up of sensor events in the app and notifications via the app and email.
For project administrators, it offers an overview of all sensor devices across one or more projects. This provides not only trap status, but also early incursion warning, accountability for funders, and the social benefits of knowing when to start the kōrero with trappers.
Adding a sensor to a trap via the website
- Through the Projects page select traps, - add a new trap
- Complete the required fields
4. Under the map open more tab and complete the sensor data, required contact fields, and select save
Notifications
- Turn on notifications on both the My Account > Edit page and against each trap

- Enable notifications for each trap


If the trap is a live capture trap (is a cage or smart cage and has sensors set), they will get a variation of this message.

All managers and admins (anyone who can add a trap record or edit the installation) are shown to be notified . We only show the first three and the user can expand to see the rest
If the trap has sensors then admins will now be able to see who is getting notifications and uncheck / check them.
If a trap is saved or added and it is a live capture cage (cage with sensors) then we will automatically subscribe whoever made the change to the trap if there is no one assigned yet
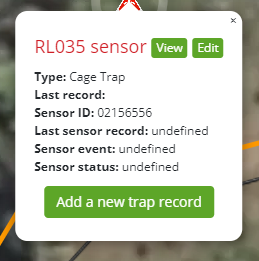
Servicing a sensor trap
When a sensor has triggered, the trap.nz notification system will send an email and message to the trap.nz app. Do not rely on these notifications for legal coverage, trappers must still check the status of all sensor traps via the app or website. This ensures that sensors that are not responding are detected, and it covers the scenario when the notifications fail due to network outages, spam filters, etc.
- The sensor is triggered and the sensor provider sends an email and message via the trap.nz App
The new trap icons
To align with trap.nz mobile phone app the icons have been changed to
trap |
|
Sensor trap - active |
|
Sensor trap - active & sprung |
|
Sensor trap - inactive |
|
By selecting the installation you are able to see its current status.
All sensor statuses are viewable in the Trap.nz sensor reports.
Please contact us to become a sensor service provider.
Also see this document on checking your sensor traps
https://help.trap.nz/books/trapnz-comprehensive-user-guide/page/check-your-sensors
Adding One-off records - using the website
One-off records are observations or catches you wish to add to your project without associating them with an installation.
trap.nz has two ways to add one-off records. You can use either the mobile phone trap.nz app or the trap.nz website.
For instructions on how to add one-off records with the mobile phone trap.nz app, click this link
https://help.trap.nz/books/trapnz-comprehensive-user-guide/page/adding-one-off-records-phone-app
These are the instructions for adding records via the website.
Open the project you want to add records to and click on the one-off record
This will open the option to add one-off pest control or one-off observations.
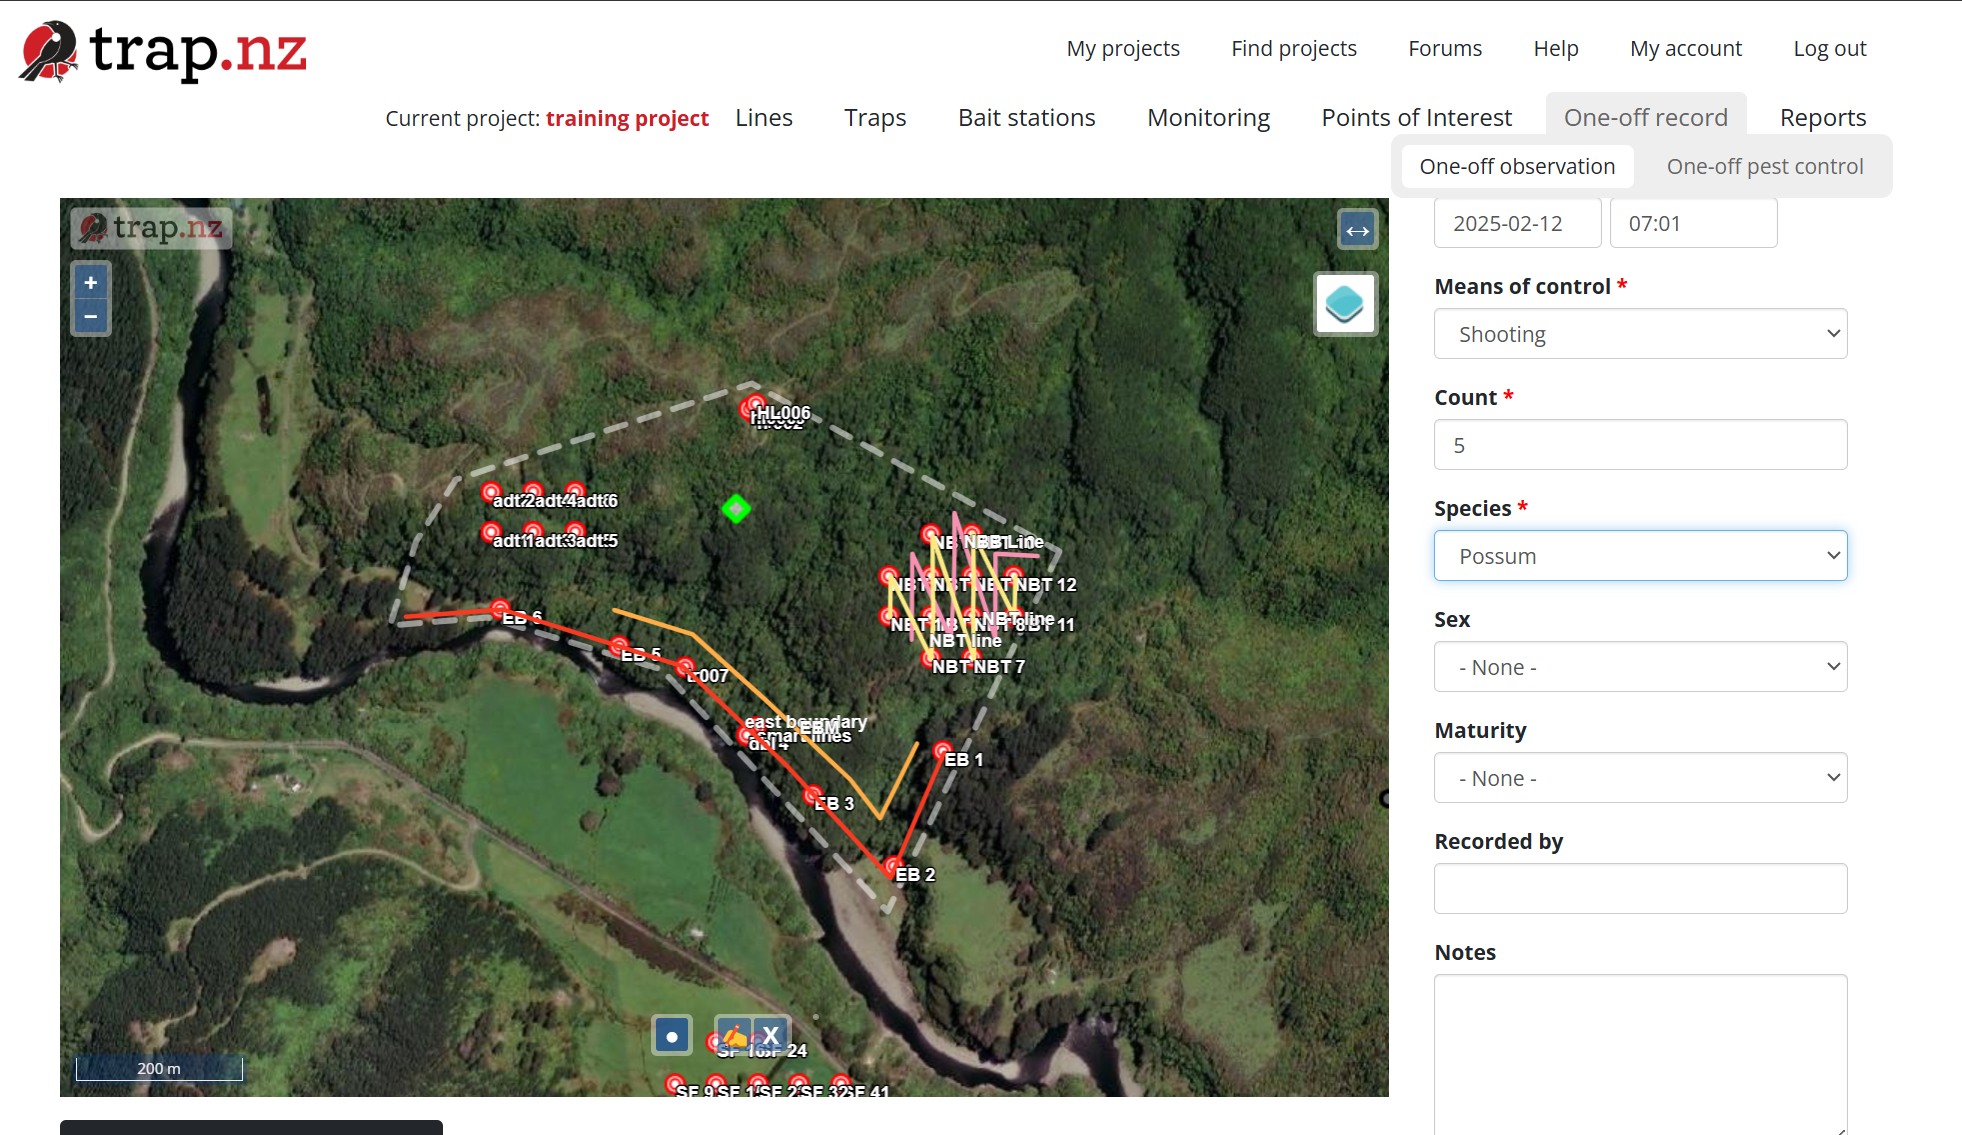
Complete the required fields and select the location using the tool at the bottom of the map. The following fields are available:
Date: This can be adjusted if you are adding a historical record.
Means of Control: Specify the method used to control the animals:
Shooting
Roadkill
Predation: Animals caught by a cat, dog, or another predator.
Unknown: If the cause of death is unclear.
Toxin: If the animal's death resulted from exposure to a toxin.
Other: Any method not listed above.
Count: Indicate how many animals were culled.
Species: Select from the available list.
Sex: Provide the gender of the animal, if known. This field is not applicable for multiple animals.
Maturity: Specify whether the animal was juvenile or adult.
Recorded by: Enter the name of the individual who recorded the data.
Notes: Any additional relevant information you wish to include.
Once completed, please select the location. You may also attach any images related to the record.
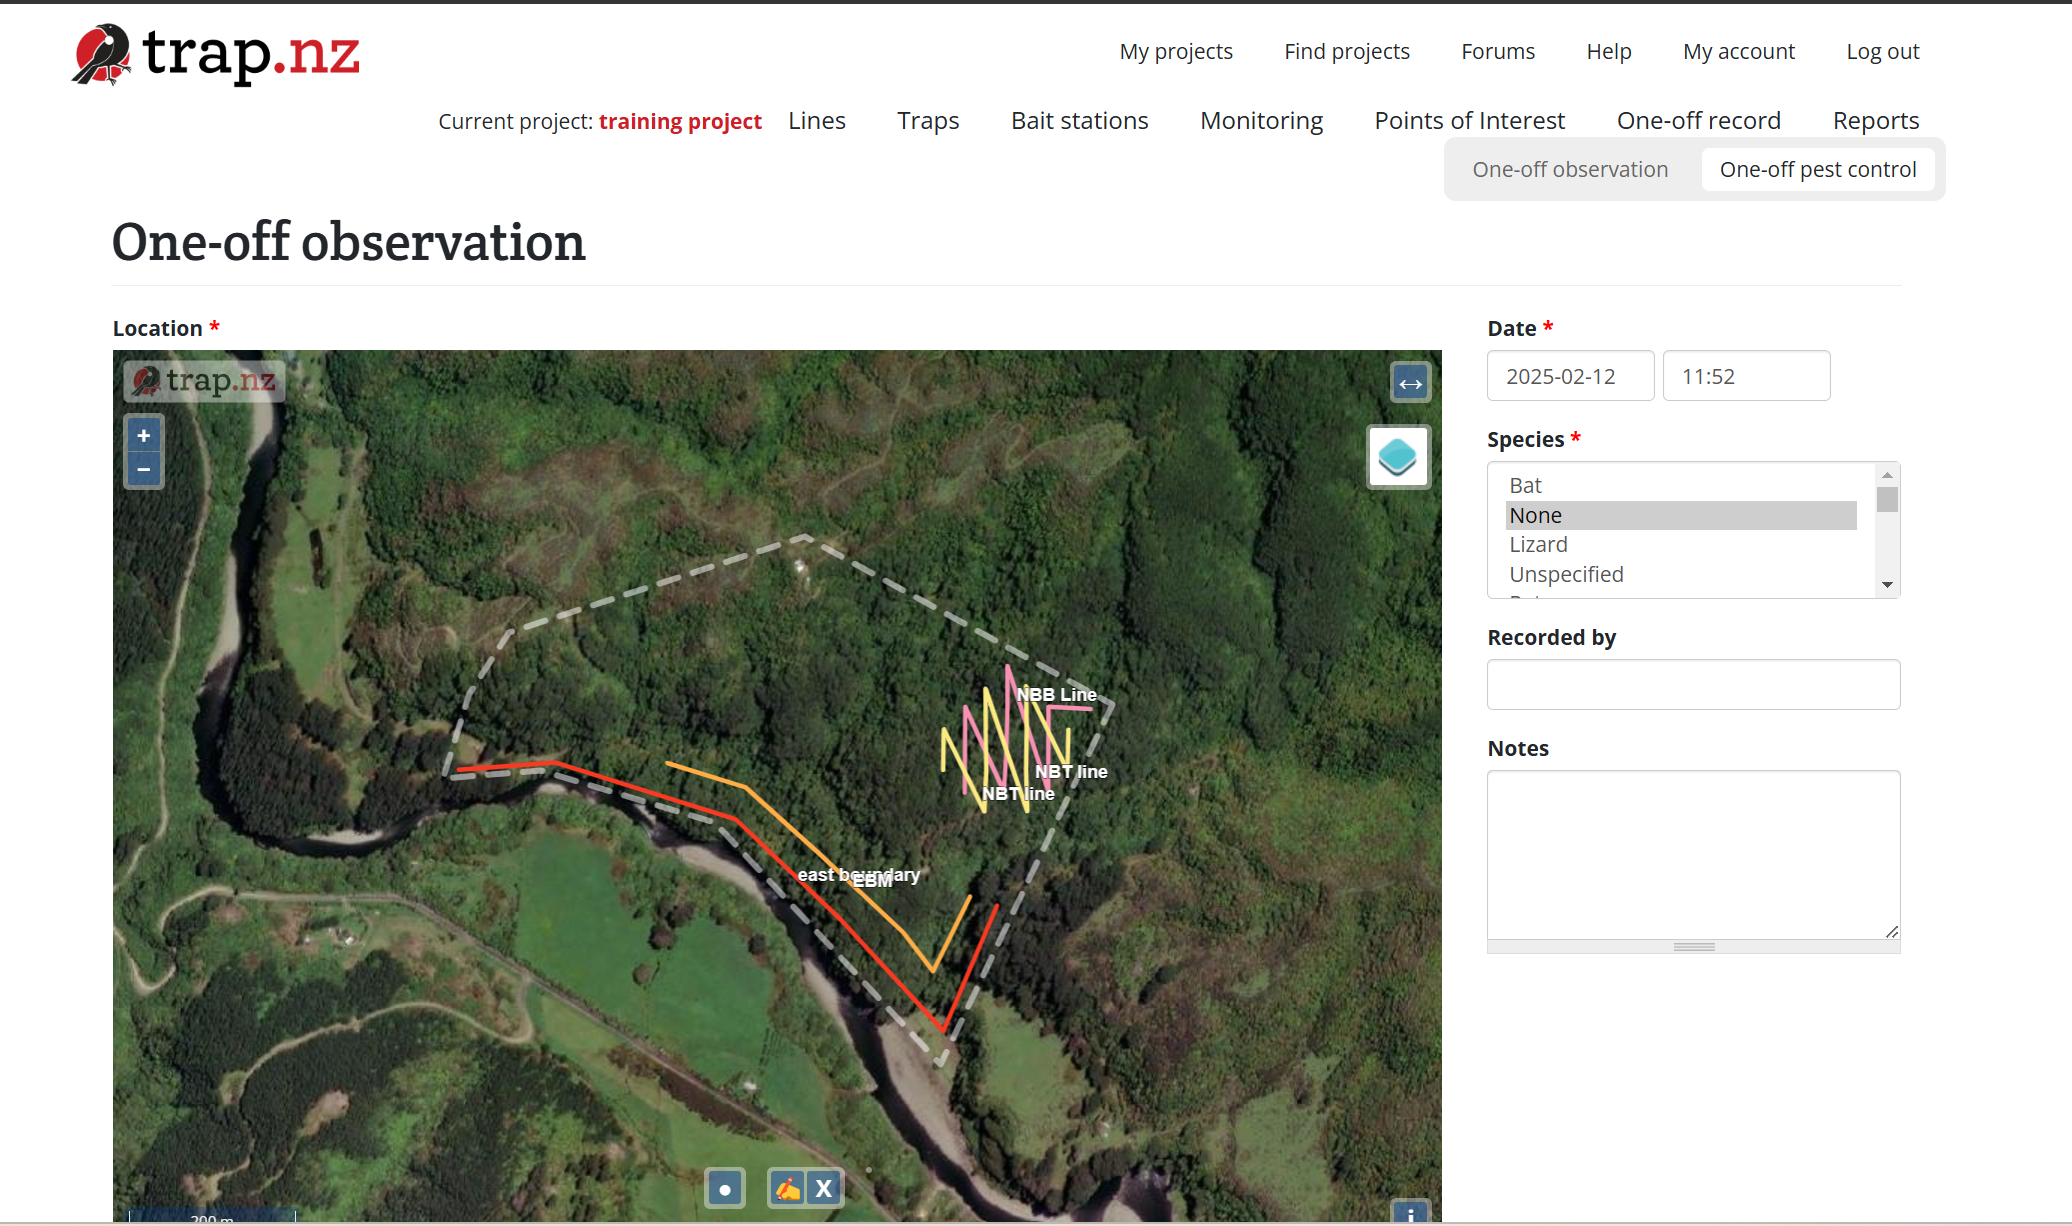
Complete the required fields and select the location using the tool at the bottom of the map. The following fields are available:
Date: This can be adjusted if you are adding a historical record.
Species: Select from the available list.
Recorded by: Enter the name of the individual who recorded the observation.
Notes: Any additional relevant information you wish to include.
Don’t forget to save your records.