# Mobile app To use the app you need an account on the Trap.NZ website which is a member of an existing project. The Trap.NZ app works with the TrapNZ website and allows you to record trapping data on your phone. With it, you can plot traps, bait stations, monitoring stations, and bird count locations. You can also add records to installations (traps, stations and locations) when you are out in the field. # App: Getting started
The Trap.NZ app works with the TrapNZ website and allows you to record trapping data on your phone. With it, you can [plot traps, bait stations, monitoring stations, and bird count locations](https://help.trap.nz/books/trapnz-comprehensive-user-guide/page/app-adding-installations). You can also [add records](https://help.trap.nz/books/trapnz-comprehensive-user-guide/page/trap-records) to installations (traps, stations and locations) when you are out in the field. The app will show you a map of your project area and works offline (when you are out of cell phone or WiFi coverage). Records are stored and synced automatically whenever there is a data connection available. [More app help...](https://help.trap.nz/books/trapnz-comprehensive-user-guide/chapter/mobile-app)
![Download on the App Store](https://trap.nz/sites/default/files/images/help/badge-example-preferred_2x.png)![Get it on Google Play](https://play.google.com/intl/en_us/badges/images/generic/en_badge_web_generic.png)
# New Page # App: Logging in
***To use the app you need [an account on the Trap.NZ website](https://help.trap.nz/books/trapnz-comprehensive-user-guide/page/creating-a-new-account "Creating a new account") which is a [member of an existing project](https://help.trap.nz/books/getting-started/chapter/joining-or-starting-a-project "Joining or starting a project").*** If you don’t have an account, go to the [Create new account](https://trap.nz/user/register) page. After you have created an account and logged into the website, you can then [create your own trapping project](https://help.trap.nz/books/trapnz-comprehensive-user-guide/page/creating-a-new-project "Creating a new project"), or [request to join other projects](https://help.trap.nz/books/trapnz-comprehensive-user-guide/page/joining-an-existing-project "Joining an existing project"). As soon as you have an account which belongs to a project, you can use the app. The main app menu allows you to select a project, and from there you can begin adding data or changing the app settings. ![](https://trap.nz/sites/default/files/images/help/projects_list.png)
# App: Understanding the project map [![app map understanding.png](https://help.trap.nz/uploads/images/gallery/2023-04/scaled-1680-/app-map-understanding.png)](https://help.trap.nz/uploads/images/gallery/2023-04/app-map-understanding.png) #### Map Icons
Serviced todayWithin service periodOutside service period / no records
Trap [![Trap icon (checked)](https://help.trap.nz/uploads/images/gallery/2022-03/scaled-1680-/image-1646707916805.png)](https://help.trap.nz/uploads/images/gallery/2022-03/image-1646707916805.png) [![Trap icon (active)](https://help.trap.nz/uploads/images/gallery/2022-03/scaled-1680-/image-1646707909196.png)](https://help.trap.nz/uploads/images/gallery/2022-03/image-1646707909196.png) [![image-1646707923321.png](https://help.trap.nz/uploads/images/gallery/2022-03/scaled-1680-/image-1646707923321.png)](https://help.trap.nz/uploads/images/gallery/2022-03/image-1646707923321.png)
Bait station [![Bait station](https://help.trap.nz/uploads/images/gallery/2022-03/scaled-1680-/image-1646707333989.png)](https://help.trap.nz/uploads/images/gallery/2022-03/image-1646707333989.png)[![Bait station icon](https://help.trap.nz/uploads/images/gallery/2022-03/scaled-1680-/image-1646708104254.png)](https://help.trap.nz/uploads/images/gallery/2022-03/image-1646708104254.png) [![Bait station](https://help.trap.nz/uploads/images/gallery/2022-03/scaled-1680-/image-1646707690987.png)](https://help.trap.nz/uploads/images/gallery/2022-03/image-1646707690987.png)
Monitoring station [![Monitoring station icon](https://help.trap.nz/uploads/images/gallery/2022-03/scaled-1680-/image-1646707856984.png)](https://help.trap.nz/uploads/images/gallery/2022-03/image-1646707856984.png)[![Monitoring station icon](https://help.trap.nz/uploads/images/gallery/2022-03/scaled-1680-/image-1646707851219.png)](https://help.trap.nz/uploads/images/gallery/2022-03/image-1646707851219.png) [![Monitoring station icon](https://help.trap.nz/uploads/images/gallery/2022-03/scaled-1680-/image-1646707863615.png)](https://help.trap.nz/uploads/images/gallery/2022-03/image-1646707863615.png)
Bird count site [![Bird count site](https://help.trap.nz/uploads/images/gallery/2022-03/scaled-1680-/image-1646707785061.png)](https://help.trap.nz/uploads/images/gallery/2022-03/image-1646707785061.png)![Bird count site](https://help.trap.nz/uploads/images/gallery/2022-03/scaled-1680-/image-1646707813800.png)N/A
Point of Interest N/AN/A[![image-1656549270732.png](https://help.trap.nz/uploads/images/gallery/2022-06/scaled-1680-/image-1656549270732.png)](https://help.trap.nz/uploads/images/gallery/2022-06/image-1656549270732.png)
#### ![](https://trap.nz/sites/default/files/images/help/layers_icon.png) Layers menu Tap the layers icon to view your Layer options. [![filters layers menu (2).png](https://help.trap.nz/uploads/images/gallery/2022-07/scaled-1680-/filters-layers-menu-2.png)](https://help.trap.nz/uploads/images/gallery/2022-07/filters-layers-menu-2.png) Initially, only the Filters options are available, which allow you to select which installation types are visible on the map. You can choose additional layer menu options under [General Settings](https://help.trap.nz/books/trapnz-comprehensive-user-guide/page/general-settings "General settings") (such as the topographic base map, city and street labels and parcel boundaries). See [more about the available layers](https://help.trap.nz/books/trapnz-comprehensive-user-guide/page/map-features "Map features").[![Optional map settings](https://help.trap.nz/uploads/images/gallery/2022-03/scaled-1680-/image-1646784198573.jpeg)](https://help.trap.nz/uploads/images/gallery/2022-03/image-1646784198573.jpeg) When these extra options are visible, you can also choose between streets and topographic maps. ![](https://trap.nz/sites/default/files/images/help/drawer_icon.png) Tap the close drawer icon to close the layers menu. [![tile features (2).png](https://help.trap.nz/uploads/images/gallery/2022-07/scaled-1680-/tile-features-2.png)](https://help.trap.nz/uploads/images/gallery/2022-07/tile-features-2.png) #### ![](https://trap.nz/sites/default/files/images/help/search_icon.png) Search Use the search tool to find installations by name. As you type, all installations with matching text are listed. You can then tap the installation name to view it on the map, or click the edit icon [![image-1648079149061.jpeg](https://help.trap.nz/uploads/images/gallery/2022-03/scaled-1680-/image-1648079149061.jpeg) ](https://help.trap.nz/uploads/images/gallery/2022-03/image-1648079149061.jpeg)to add a new record to it. [![Using the search bar to filter installations by name](https://help.trap.nz/uploads/images/gallery/2022-03/scaled-1680-/image-1648078864997.jpeg)](https://help.trap.nz/uploads/images/gallery/2022-03/image-1648078864997.jpeg) # App: Menu overview
To access the app menu, click on the "hamburger" menu (the three horizontal lines in the top right corner of the app) You get to the settings menu by clicking on the three horizontal lines in the top right corner (sometimes called the hamburger!). [![App menu](https://help.trap.nz/uploads/images/gallery/2022-03/scaled-1680-/image-1648084861443.jpeg)](https://help.trap.nz/uploads/images/gallery/2022-03/image-1648084861443.jpeg) ##### [**Project Settings**](https://help.trap.nz/books/trapnz-comprehensive-user-guide/page/project-settings "Project settings") Re-download files and set offline preferences ##### **Logs** Shows a list of recent updates from the app to the server with problems highlighted. Clicking on these messages gives more detailed information for debugging purposes. ##### **Project lines** Shows a list of your project lines. When you want to service a line, you can go to this menu to select the line you wish to service, and all the installations on that line will appear in a list. Click the edit button on the first installation you want to service to start adding records. As you save each record, the next installation's record form will load, making walking a line easier. ##### **My Projects** Takes you back to your project list where you can switch to another project. ##### [**Settings**](https://help.trap.nz/books/trapnz-comprehensive-user-guide/page/general-settings "General settings") General app settings live here, including: - Map layer preferences - Record defaults - Notification settings - Advanced settings ##### **About** Links to support and privacy policy, and the app version number. ##### **Sign out** Log out of the mobile app.
# App: Project settings
[![project settings (3).png](https://help.trap.nz/uploads/images/gallery/2022-07/scaled-1680-/project-settings-3.png)](https://help.trap.nz/uploads/images/gallery/2022-07/project-settings-3.png) The app's Project Settings menu can be accessed from the [app menu](https://help.trap.nz/books/trapnz-comprehensive-user-guide/page/app-menu-overview "App: Menu overview"). ##### Synchronise Project Normally, changes to projects are synced automatically. For example - if someone else adds a trap or bait station to a project, this will become visible in the app within a few minutes. Clicking this button will immediately flush the project cache and force a refresh of the entire project. #### Tile management ##### Refresh map tiles This will re-download the map tiles for the project. This is usually not necessary, but if your map has gaps, this button may help download them. ##### Max tile set size This is the number of megabytes dedicated to the map tile set of this project. If you need better resolution on the map you can increase this value at the cost of space on your device. Equally, f you are concerned about the lack of space on your device and don't need the map detail, you can decrease this value. If in doubt leave it at the default (100). The Hi-Res zoom limit indicates which zoom level the tiles will start to degrade at. The maximum zoom is 21, so if yours says 13 / 21, the map will get increasingly fuzzy as you zoom beyond zoom level 13.
[![Image courtesy of https://www.researchgate.net/profile/Ning-Guo-2](https://help.trap.nz/uploads/images/gallery/2024-03/scaled-1680-/image-1709870103863.png)](https://help.trap.nz/uploads/images/gallery/2024-03/image-1709870103863.png)
# App: General settings When you first open the Settings menu, you will see each of the categories listed. Tap on the category you want to view the settings for, and the settings for that category will become visible. You can click the question mark next to each option to get more information about what the option does. #### Map ##### [![settings map (2).png](https://help.trap.nz/uploads/images/gallery/2022-07/scaled-1680-/settings-map-2.png)](https://help.trap.nz/uploads/images/gallery/2022-07/settings-map-2.png)Enable base map options Enabling any of these base map options makes them available via the layer control on the map, so you can switch between the enabled base map options. **Satellite** Enables the satellite base map. **Topographic** Enables the topographic base map. **Streets** Enables the street's base map. ##### Enable layer options Layer options provide additional detail to the map. **Parcel Boundaries** Provides a map of the land, road, and other parcel boundaries, which is great for contractors and volunteers on private and public land. These are displayed as a black outline overlaid on top of the current base map. **Labels** Shows labels for regions, cities, towns, and street names on top of the current base map. **Auto map centering** Automatically move the map to keep your location in the centre of the screen. **Display installation labels** This will turn labels on or off for your traps, bait stations, and monitoring sites. The labels only show when you are zoomed in. **Display line labels** This will turn labels on or off for your lines in the map view. **Hi-res tiles on demand** This setting will automatically download higher detail maps when you have an internet connection available (mobile or WiFi). Ideal for urban projects where network coverage is available and higher accuracy is required. These are only stored temporarily on your device and won't be available offline. To save high-detail map tiles for offline use, change the Max tile set size in [Project settings](https://help.trap.nz/books/trapnz-comprehensive-user-guide/page/app-project-settings "App: Project settings"). #### Records **[![settings records (2).png](https://help.trap.nz/uploads/images/gallery/2022-07/scaled-1680-/settings-records-2.png)](https://help.trap.nz/uploads/images/gallery/2022-07/settings-records-2.png)** **Enable advanced record fields** Enables advanced record fields such as Sex and Life stage **Display installation details** Installations can have notes entered against them on the website. Notes can be used to record hazards or access details. Notes (including some other information like coordinates and when the last record was added) can be automatically displayed when adding a record. Check this box to automatically display the installation notes. **Recorder** The name is used to identify records you make. Defaults to your name on Trap.NZ. ##### General [![settings general (3).png](https://help.trap.nz/uploads/images/gallery/2022-07/scaled-1680-/settings-general-3.png)](https://help.trap.nz/uploads/images/gallery/2022-07/settings-general-3.png) **Accessibility Mode** Where possible and appropriate display user-friendly labels on buttons, larger fonts, etc **Smart Lines** Smart lines will automatically pull other installations into an existing line if it is within a metre of another line member If switched off, only installations that are at the exact coordinates of line members will be pulled in. **Notifications** Help popups will appear in some situations - you can disable these once you know your way around the app. **Auto-sync incoming changes** By default, this setting is enabled, and the project will automatically update when project changes occur. This can affect performance on large projects with multiple trappers working simultaneously - in which case we recommend disabling this setting. ![](https://trap.nz/sites/default/files/images/help/image21.png) When disabled, a cloud download button will appear in the menu bar when changes are detected. Press this to manually sync the changes. **Maintenance** After this period, installations are highlighted in red to indicate they need attention. Defaults to 90 days. #### Advanced[![settings advanced (2).png](https://help.trap.nz/uploads/images/gallery/2022-07/scaled-1680-/settings-advanced-2.png)](https://help.trap.nz/uploads/images/gallery/2022-07/settings-advanced-2.png) **Enable contractor mode** Enables contractor mode. This opens up a contact section in the installations setup screen. The contact details are available on the trap.NZ website under the installation **Disable Android Accelerated Hardware** **Reset app** Press and hold this button to reset the app. ***Any saved settings and un-synced records will be lost.*** # App: Checking the sync logs
To view your app logs, select Logs from the [app menu](https://help.trap.nz/books/trapnz-comprehensive-user-guide/page/app-menu-overview "App: Menu overview"). When the Trap.NZ app is used offline (without internet access) your data is stored locally on the device until you have internet access again. Your data is synced automatically once an internet connection is available. Logs show the sync status of your data:
- Synced (safely on the Trap.NZ website) - Queued (to be be synced as soon as internet access is restored), or - Failed to sync (something went wrong with the syncing) The cloud icon indicates items that are queued and have yet to be synced with the Trap.NZ website. ![](https://trap.nz/sites/default/files/images/help/2021/Logs/Help-Logs-07.png) When you click on an entry, the data for that entry will be shown. - If an entry has synced, you will see a button to “View Online”, which directs you to the website where you can view and edit the entry. - If an entry has failed, you can view the failed message here, and use the **retry** button to try syncing it again ![](https://trap.nz/sites/default/files/images/help/2021/Logs/Help-Logs-03.jpg) #### View your project log 1. Click on the hamburger menu in the top right corner of your project map to open the app menu![](https://trap.nz/sites/default/files/images/help/2021/Logs/Help-Logs-01.jpeg) 2. Select "Logs" from the app menu ![](https://trap.nz/sites/default/files/images/help/2021/Logs/Help-Logs-02.jpeg)
# App: Adding installations #### To add an installation to your project 1. Locate where you want to add the installation on the map. You can do this by: - Using the pan and zoom controls to the desired location on the map, and press the Add button ![](https://trap.nz/sites/default/files/images/help/IMG_0659%20copy.png) in the bottom right of the screen. - If you are physically at the installation site, use the GPS button ![](https://trap.nz/sites/default/files/images/help/IMG_0659%20copy%202.png) to locate yourself on the map. 2. If the location appears wrong, drag the reticule (black crosshairs with red dot in the middle) to the correct spot and press the green tick to confirm (or the red cross to cancel). [![adding installations (2).png](https://help.trap.nz/uploads/images/gallery/2022-07/scaled-1680-/adding-installations-2.png)](https://help.trap.nz/uploads/images/gallery/2022-07/adding-installations-2.png) 3. Choose which type of installation to add: Bait Station, Trap , Monitoring Site [![add installation (2).png](https://help.trap.nz/uploads/images/gallery/2022-07/scaled-1680-/add-installation-2.png)](https://help.trap.nz/uploads/images/gallery/2022-07/add-installation-2.png) # Adding a Collocated Installation #### To add a collocated installation Collocated installations are installations located in the same place - for example: - a trap and a monitoring site at the same location - a double-set trap - traps for different species in one spot. ***Same place*** means having exactly the same coordinates (longitude, latitude.) To add a collocated installation, you can simply copy the coordinates from one installation to another. We recommend you use the app however as this is simplifies the process. These instructions assume you already have at least one installation at the desired location in your project. If not, follow the instructions for adding an installation above. When you're logged in to the app and are looking at your project map: 1. Log in to the app, and select your project - the project map will load 2. Tap on the existing installation at the desired location - the record form for that installation will load 3. Scroll down to the bottom of the form, and tap on "Add collocated installation" 4. Select which type of installation you want to add 5. Enter the details for this installation in the form that loads 6. Press and hold the "Save" button to save this installation. It will be located at the same coordinates as the original installation. [![add collocated installation.jpg](https://help.trap.nz/uploads/images/gallery/2022-07/scaled-1680-/add-collocated-installation.jpg)](https://help.trap.nz/uploads/images/gallery/2022-07/add-collocated-installation.jpg) If you have not selected "display installation details" in the settings menu of the app you will see this screen. To open the options as shown above, click on the "installation details" [![additional installation details.PNG](https://help.trap.nz/uploads/images/gallery/2023-04/scaled-1680-/additional-installation-details.PNG)](https://help.trap.nz/uploads/images/gallery/2023-04/additional-installation-details.PNG) # Installing sensor traps Sensor traps allow the trapper to service the traps when they have been sprung. This removes the time spent checking traps that have not caught anything freeing up the trappers' time. The steps to install a sensor trap using the trap.nz phone app are the same as that of a standard trap. [![1.png](https://help.trap.nz/uploads/images/gallery/2023-06/scaled-1680-/1.png)](https://help.trap.nz/uploads/images/gallery/2023-06/1.png)[![2.png](https://help.trap.nz/uploads/images/gallery/2023-06/scaled-1680-/2.png)](https://help.trap.nz/uploads/images/gallery/2023-06/2.png) [![3.png](https://help.trap.nz/uploads/images/gallery/2023-06/scaled-1680-/3.png)](https://help.trap.nz/uploads/images/gallery/2023-06/3.png)[![4.png](https://help.trap.nz/uploads/images/gallery/2023-06/scaled-1680-/4.png)](https://help.trap.nz/uploads/images/gallery/2023-06/4.png) To add a sensor trap, you must tick the check box and add the sensor provider and sensor ID. [![5.png](https://help.trap.nz/uploads/images/gallery/2023-06/scaled-1680-/5.png)](https://help.trap.nz/uploads/images/gallery/2023-06/5.png)[![6.png](https://help.trap.nz/uploads/images/gallery/2023-06/scaled-1680-/6.png)](https://help.trap.nz/uploads/images/gallery/2023-06/6.png) [![7.png](https://help.trap.nz/uploads/images/gallery/2023-06/scaled-1680-/7.png)](https://help.trap.nz/uploads/images/gallery/2023-06/7.png) Access the Menu, Logs and click on the installation you have just added to ensure the trap shows as a sensor trap [![8.png](https://help.trap.nz/uploads/images/gallery/2023-06/scaled-1680-/8.png)](https://help.trap.nz/uploads/images/gallery/2023-06/8.png)[![9.png](https://help.trap.nz/uploads/images/gallery/2023-06/scaled-1680-/9.png)](https://help.trap.nz/uploads/images/gallery/2023-06/9.png) *Trigger the trap a number of times to push a sensor message through the system. When mobile data reception is available, synchronise the app and ensure the sensor status has been updated (green or red.) If the status has not changed, double check the sensor details are correct, and sensor network coverage is available in the trapping area.* *[![10.png](https://help.trap.nz/uploads/images/gallery/2023-06/scaled-1680-/10.png)](https://help.trap.nz/uploads/images/gallery/2023-06/10.png)[![11.png](https://help.trap.nz/uploads/images/gallery/2023-06/scaled-1680-/11.png)](https://help.trap.nz/uploads/images/gallery/2023-06/11.png)[![12.png](https://help.trap.nz/uploads/images/gallery/2023-06/scaled-1680-/12.png)](https://help.trap.nz/uploads/images/gallery/2023-06/12.png)* *The following error indicates the sensor is currently assigned to another trap in trap.nz. To continue, the sensor needs to be removed from that trap. This might require a project administrator to locate and make the required changes* *[![13.png](https://help.trap.nz/uploads/images/gallery/2023-06/scaled-1680-/13.png)](https://help.trap.nz/uploads/images/gallery/2023-06/13.png)* # Map features [![tile features (2).png](https://help.trap.nz/uploads/images/gallery/2022-07/scaled-1680-/oiQtile-features-2.png)](https://help.trap.nz/uploads/images/gallery/2022-07/oiQtile-features-2.png) By default, only the **Filters** list is shown. This allows you to select which kind of stations are visible on the map. To enable additional map features visit the [General Settings](https://help.trap.nz/books/trapnz-mobile-app-user-guide/page/general-settings) screen. #### Base maps **Satellite** Shows photographic satellite images. **Streets** Shows a street map. This must be enabled by selecting Topology in General settings. #### Layers **Parcel boundaries** Provides an outline of land, road, and other parcel boundaries, and is especially useful for displaying property boundaries. Enabled by selecting Parcel boundaries in General settings. #### Filters Allows you to adjust the default map view showing traps, bait, monitoring stations, and points of interest. # Records overview Using the map, tap on the icon for any installation to add a record to it. If the installation is part of a trap/bait line you will see a representation of the current line at the top of the screen: ![](https://trap.nz/sites/default/files/images/help/IMG_0695.png) The arrow indicates the position of the installation you are currently adding a record to. Installations that haven't been updated within the maintenance period (see [General Settings](https://help.trap.nz/books/trapnz-comprehensive-user-guide/page/general-settings "General settings")) are red. Installations that have been updated within the maintenance period are green. The navigation arrows at the bottom of the screen will take you to the next or previous installation on the line. This makes it easy to update traps in order as you walk a trap line. ![](https://trap.nz/sites/default/files/images/help/Screen%20Shot%202019-09-05%20at%2010.11.44%20AM.png) Press and hold the save button until you see the ‘SAVED’ message, this will to upload the record to Trap.NZ. The close button will take you back to the project map. # Trap records **[![image-1633571540949.png](https://help.trap.nz/uploads/images/gallery/2021-10/scaled-1680-/image-1633571540949.png)](https://help.trap.nz/uploads/images/gallery/2021-10/image-1633571540949.png)Date** Defaults to the current date and time. Tap it to change it. **Species caught** Select a species from the list or leave as None. **Trap status** Select a status from the list. **Condition** Select a maintenance condition from the list. **Re-baited** If you re-baited the trap, check this box and select the bait type from the list. **Bait notes** If you used a bait type which is not on the list you can note it here. **Notes** Add any notes about the check here. **Installation details** Tapping this will display additional details about the installation and display the "Add collocated installation" button. This allows you to create another installation at the same location. You can pin this open by checking the Display installation details checkbox in [General settings](https://help.trap.nz/books/trapnz-comprehensive-user-guide/page/general-settings "General settings"). [![image-1633571634204.png](https://help.trap.nz/uploads/images/gallery/2021-10/scaled-1680-/image-1633571634204.png)](https://help.trap.nz/uploads/images/gallery/2021-10/image-1633571634204.png) When saved, the record indicator at the top will turn green, as will the border around the trap on the map. ![](https://trap.nz/sites/default/files/images/help/IMG_0685.png) ![](https://trap.nz/sites/default/files/images/help/IMG_0686.png) # Bait station records
**** **Date** Defaults to the current date and time. Tap it to change it. **Target species** Select a species from the list or leave as None. **Formulation** Select a bait formulation from the list. **Active ingredient** Select the active ingredient for the bait from the list. **Concentration %** Enter the % concentration of the active ingredient. **Bait remaining** Drag the slider to select the amount of bait remaining when you checked it. **Bait removed** Drag the slider to select the amount of bait removed after checking. **Bait added** Drag the slider to select the amount of bait added after you checked it. **Notes** Add any notes about the check here. **[![updating installations (2).png](https://help.trap.nz/uploads/images/gallery/2022-07/scaled-1680-/updating-installations-2.png)](https://help.trap.nz/uploads/images/gallery/2022-07/updating-installations-2.png)** [![bait 3 (2).png](https://help.trap.nz/uploads/images/gallery/2022-07/scaled-1680-/bait-3-2.png)](https://help.trap.nz/uploads/images/gallery/2022-07/bait-3-2.png) **Installation details** Tapping this will display additional details about the installation and display the "Add collocated installation" button. This allows you to create another installation at the same location. You can pin this open by checking the Display installation details checkbox in [General settings](https://help.trap.nz/books/trapnz-comprehensive-user-guide/page/general-settings "General settings"). [![bait 4 (2).png](https://help.trap.nz/uploads/images/gallery/2022-07/scaled-1680-/bait-4-2.png)](https://help.trap.nz/uploads/images/gallery/2022-07/bait-4-2.png) When saved, the record indicator at the top will turn green, as will the border around the station on the map.
# Monitoring station records [![monitoring station record (2).png](https://help.trap.nz/uploads/images/gallery/2022-07/scaled-1680-/monitoring-station-record-2.png)](https://help.trap.nz/uploads/images/gallery/2022-07/monitoring-station-record-2.png) **Date** Defaults to the current date and time. Tap it to change it. **Target species** Select a species from the list or leave it as None. **Lure** Select a lure from your favorites list. **Notes** Add any notes about the check here. **Installation details** Tapping this will display additional details about the installation and display the "Add collocated installation" button. This allows you to create another installation at the same location. You can pin this open by checking the Display installation details checkbox in [General settings](https://help.trap.nz/books/trapnz-comprehensive-user-guide/page/general-settings "General settings"). [![bait 4 (2).png](https://help.trap.nz/uploads/images/gallery/2022-07/scaled-1680-/bait-4-2.png)](https://help.trap.nz/uploads/images/gallery/2022-07/bait-4-2.png) When saved, the record indicator at the top will turn green, as will the border around the station on the map. # Setting up a Bird count monitoring station After undertaking pest eradication in an area, you will see a decline in catches and bait take, however, another way to see if there has been an improvement is to complete regular bird counts. trap.nz phone app has a bird count function to help you complete this. A bird count should be held at the same time, date, and season as previously, however, any monitoring that is taking place is good, and will still show changes. The protocol for the 5-minute bird count is here [https://www.doc.govt.nz/globalassets/documents/science-and-technical/inventory-monitoring/im-toolbox-birds-incomplete-five-min-counts.pdf](https://www.doc.govt.nz/globalassets/documents/science-and-technical/inventory-monitoring/im-toolbox-birds-incomplete-five-min-counts.pdf) To set up a Bird count station You will need to add a monitoring station either via the phone app or website and select “monitoring type” - bird count. ### Setting up a Bird-count station via the website Click the install tab on the bottom right of the map window [![web2.png](https://help.trap.nz/uploads/images/gallery/2022-12/scaled-1680-/web2.png)](https://help.trap.nz/uploads/images/gallery/2022-12/web2.png) [![web 1.png](https://help.trap.nz/uploads/images/gallery/2022-12/scaled-1680-/web-1.png)](https://help.trap.nz/uploads/images/gallery/2022-12/web-1.png) [![web3.png](https://help.trap.nz/uploads/images/gallery/2022-12/scaled-1680-/web3.png)](https://help.trap.nz/uploads/images/gallery/2022-12/web3.png) [![web4.png](https://help.trap.nz/uploads/images/gallery/2022-12/scaled-1680-/web4.png)](https://help.trap.nz/uploads/images/gallery/2022-12/web4.png) [![web5.png](https://help.trap.nz/uploads/images/gallery/2022-12/scaled-1680-/web5.png)](https://help.trap.nz/uploads/images/gallery/2022-12/web5.png) ### Adding a bird count monitoring station via the trap.nz mobile phone app Click the install tab on the bottom right of the map window [![app1.png](https://help.trap.nz/uploads/images/gallery/2022-12/scaled-1680-/app1.png)](https://help.trap.nz/uploads/images/gallery/2022-12/app1.png) Click the green tick that has opened up [![app2.png](https://help.trap.nz/uploads/images/gallery/2022-12/scaled-1680-/app2.png)](https://help.trap.nz/uploads/images/gallery/2022-12/app2.png) Select the option of the monitoring station [![app3.png](https://help.trap.nz/uploads/images/gallery/2022-12/scaled-1680-/app3.png)](https://help.trap.nz/uploads/images/gallery/2022-12/app3.png) Complete the code name, open the monitoring type, and select bird count [![app5.png](https://help.trap.nz/uploads/images/gallery/2022-12/scaled-1680-/app5.png)](https://help.trap.nz/uploads/images/gallery/2022-12/app5.png) Save your new bird count monitoring station [![app6.png](https://help.trap.nz/uploads/images/gallery/2022-12/scaled-1680-/app6.png)](https://help.trap.nz/uploads/images/gallery/2022-12/app6.png) The bird count station will display on the app as a bird [![app7.png](https://help.trap.nz/uploads/images/gallery/2022-12/scaled-1680-/app7.png)](https://help.trap.nz/uploads/images/gallery/2022-12/app7.png) For instructions on how to use the bird count click here [https://help.trap.nz/books/trapnz-comprehensive-user-guide/page/bird-count-records](https://help.trap.nz/books/trapnz-comprehensive-user-guide/page/bird-count-records) # Bird count records
![](https://trap.nz/sites/default/files/images/help/IMG_0696.png) **Settings** Tap the cog icon ![](https://trap.nz/sites/default/files/images/help/IMG_0697%20copy%202.png) to set the type of observations (seen, or seen and heard) and to add historical records. **Species** Tap the bird icon ![](https://trap.nz/sites/default/files/images/help/IMG_0697%20copy%203.png) to select species to observe from the list. You need to select at least one species to start. ![](https://trap.nz/sites/default/files/images/help/IMG_0698.png)
**Observation types** Select whether your observations are only for birds you have Seen or whether you want to include ones you've only Heard as well. **Add historical bird count** Allows you to add observations without running the timer. ![](https://trap.nz/sites/default/files/images/help/IMG_0697.png) **Start** Tap the Start button ![](https://trap.nz/sites/default/files/images/help/IMG_0697%20copy.png) to start the timer and record observations ![](https://trap.nz/sites/default/files/images/help/IMG_0699.png) **Pause** Tapping the Pause button ![](https://trap.nz/sites/default/files/images/help/IMG_0701%20copy.png) allows you to temporarily pause the timer countdown so that you can add new species or change your settings. **Stop** Tapping the Stop button ![](https://trap.nz/sites/default/files/images/help/IMG_0701%20copy%202.png) cancels the count, removes all counts made in the current session and resets the timer. **Seen** Tapping the Seen icon ![](https://trap.nz/sites/default/files/images/help/IMG_0701%20copy%203.png) increases adds a Seen observation and increases the observation counter for that species. To remove a count, press and hold until the number decrements. **Heard** Tapping the Heard icon ![](https://trap.nz/sites/default/files/images/help/IMG_0701%20copy%204.png) adds a Heard observation and increases the observation counter for that species. To remove a count, press and hold until the number decrements. **Guidelines for entering bird count records**
**Seen and Heard** Birds that are first heard should be entered as heard (even if they are later seen). Birds that are first seen should be entered as seen **Sun (0-5)** Record approximate duration, in minutes, of bright sun on the canopy immediately overhead **Time** the trap.nz phone app automatically records the time of your bird count. **Temperature** 1 Freezing < 0 ℃ 2 Cold 0-5 ℃ 3 Cool 6-10 ℃ 4 Mild 11-15 ℃ 5 Warm 16-22 ℃ 6 Hot > 22 ℃ **Wind** The average for each 5-minute count 0 Leaves are still or move without noise 1 Leaves rustle 2 Leaves and branches in constant motion 3 Branches and tree sway **Precipitation type** None Mist Rain Hail Snow **Precipitation value** 0 None 1 Dripping foliage 2 Drizzle 3 Light 4 Moderate 5 Heavy **Other Noise** i.e other than wind, the average for the 5 minutes 0 not important 1 moderate 2 loud # Adding one-off records - Phone app You may want to add one-off catches, from shooting to road kill and predation. To add a one-off record using the phone app 1. Click on the + install tab on the bottom right of the screen and shift the crosshairs to cover the blue icon that represents you, or if you have enabled the “Context Menu” (press and hold) place your finger over your current location. [![1.png](https://help.trap.nz/uploads/images/gallery/2024-09/scaled-1680-/2kU1.png)](https://help.trap.nz/uploads/images/gallery/2024-09/2kU1.png) 2.Click the green tick tab to open the add installation page. Choose One-off pest. [![2.png](https://help.trap.nz/uploads/images/gallery/2024-09/scaled-1680-/SMh2.png)](https://help.trap.nz/uploads/images/gallery/2024-09/SMh2.png) 3. This will open the catches One-off pest form and fill out the required fields. *Note: if you have multiple catches, the Sex and life stage fields will disappear*
[![3.png](https://help.trap.nz/uploads/images/gallery/2024-09/scaled-1680-/p6U3.png)](https://help.trap.nz/uploads/images/gallery/2024-09/p6U3.png)[![4.png](https://help.trap.nz/uploads/images/gallery/2024-09/scaled-1680-/4.png)](https://help.trap.nz/uploads/images/gallery/2024-09/4.png)
4. Once you have saved the record, it will show in the paw print to the left of the screen and also as a paw print on the site on the map [![image-1726613175278.png](https://help.trap.nz/uploads/images/gallery/2024-09/scaled-1680-/image-1726613175278.png)](https://help.trap.nz/uploads/images/gallery/2024-09/image-1726613175278.png) These paw prints will stay on your app until you either do a reset, or tap the clear button in the One-off paw records ***You will currently find your records in the website's trap records tab and reporting page.*** # Point of Interest records [![image-1657678548346.png](https://help.trap.nz/uploads/images/gallery/2022-07/scaled-1680-/image-1657678548346.png)](https://help.trap.nz/uploads/images/gallery/2022-07/image-1657678548346.png) **Date** Defaults to the current date and time. Tap it to change it. **Title** This could be anything from a historic site to a sign regarding poisons laid **Type** Select from the list of hazard, important vegetation, or signage **Line** If your POI is attached to a line you can select it here. **Notes** Add any notes about the check here. **Colour** Choose the colour you want the POI to display on your map using. # Moving installations in the app Open any installation record form and expand the Installation Details panel. Use the **Move location** button to reposition the installation. If the installation has prior records and you are moving it a significant distance (greater than 10 metres) the app will offer two options: 1. **Move location** - this will create a clone, and [retire](https://help.trap.nz/books/trapnz-comprehensive-user-guide/page/retiring-installations "Retiring installations") the original installation. Use this option if you are physically moving the installation. Retired installations can be reactivated at any time. **NOTE:** No records are lost, they will still appear in reports, and shown at the **original** location. 2. **Correct position** - this simply updates the coordinates of the existing installation meaning all prior installation records will appear at the new position. For this reason only this option if you are correcting the mapped position. **NOTE:** No records are lost, they will still appear in reports, and shown at the **new** location. [![image-1633571818764.png](https://help.trap.nz/uploads/images/gallery/2021-10/scaled-1680-/image-1633571818764.png)](https://help.trap.nz/uploads/images/gallery/2021-10/image-1633571818764.png) [![image-1633572340580.png](https://help.trap.nz/uploads/images/gallery/2021-10/scaled-1680-/image-1633572340580.png)](https://help.trap.nz/uploads/images/gallery/2021-10/image-1633572340580.png) [![image-1636611577387.png](https://help.trap.nz/uploads/images/gallery/2021-11/scaled-1680-/image-1636611577387.png)](https://help.trap.nz/uploads/images/gallery/2021-11/image-1636611577387.png) # Retiring an Installation via the trap.NZ App #### Retiring an installation is used when you are no longer wanting an installation in its current position. When you’re moving an installation it’s important to remember that the records stay with the installation not the site. To ensure that your records correctly report the information for that particular site you will need to retire them. To retire, select retire, press and hold and it has retired. Retired installations can also be reactivated if wanted in the future via your projects in the trap.NZ website. [![retiring installations app.jpg](https://help.trap.nz/uploads/images/gallery/2022-07/scaled-1680-/retiring-installations-app.jpg)](https://help.trap.nz/uploads/images/gallery/2022-07/retiring-installations-app.jpg) # App: Using the "Walk Line" proximity function Using the Trap.NZ app, you can automatically record trap checks along a line using your phone’s GPS. When using this function to walk a line, the app will record a default trap check when you are near a trap. See also: [Proximity service adjustments](https://help.trap.nz/books/trapnz-comprehensive-user-guide/page/proximity-servicing-adjustments "Proximity servicing adjustments") **Note:** The phone needs to have [location services set to Always On](https://support.google.com/accounts/answer/6179507?hl=en) (Android, iOS) AND have [battery optimisation turned **off** for the Trap.nz app](https://support.google.com/pixelphone/answer/7015477?hl=en&sjid=3742722798902342138-AP) (Android.) Failing to do so will mean no tracks are recorded when the app is in the background (i.e. in your pocket.) #### How to use the app proximity function 1. Select "Lines" from the app menu. [![App menu](https://help.trap.nz/uploads/images/gallery/2022-05/scaled-1680-/image-1651712172159.jpeg)](https://help.trap.nz/uploads/images/gallery/2022-05/image-1651712172159.jpeg) Before walking your first line - check your line settings. Select the cog symbol at the top right. [![Lines settings button](https://help.trap.nz/uploads/images/gallery/2022-05/scaled-1680-/image-1651712309737.jpeg)](https://help.trap.nz/uploads/images/gallery/2022-05/image-1651712309737.jpeg) Set your preferences (tap on the ? symbol to see more detail about the preference setting). The preferences will remain set for subsequent line checks. [![Line settings](https://help.trap.nz/uploads/images/gallery/2022-05/scaled-1680-/image-1651709995847.jpeg)](https://help.trap.nz/uploads/images/gallery/2022-05/image-1651709995847.jpeg) - - - Proximity Max Distance: the distance you are from the trap before it records a trap check. Because a phone's GPS can take a while to catch up to your location, we recommend setting this to at least 20m. - GPS Accuracy Buffer: can generally be left as is. - Show out of range installations: You will probably want to show out of range installations to begin with - this will show all the traps in the line with an indicator showing which traps have records added to them. Hit the back arrow in the top left corner when you're done updating your Line Settings, to return to the Lines menu Select the line you are servicing. [![image-1645573325110.jpg](https://help.trap.nz/uploads/images/gallery/2022-02/scaled-1680-/image-1645573325110.jpg)](https://help.trap.nz/uploads/images/gallery/2022-02/image-1645573325110.jpg) The traps on the line you selected will be listed (at the bottom of the screen, you can toggle between a list view and a map view of the line). [![Line view with map toggle highlighted](https://help.trap.nz/uploads/images/gallery/2022-05/scaled-1680-/image-1651711235328.jpeg)](https://help.trap.nz/uploads/images/gallery/2022-05/image-1651711235328.jpeg) From the list view, click the "Walk Line" button (top right) to begin. [![Walk the line button on list view](https://help.trap.nz/uploads/images/gallery/2022-05/scaled-1680-/image-1651711602917.jpeg)](https://help.trap.nz/uploads/images/gallery/2022-05/image-1651711602917.jpeg) The different types of trap you have on this line will be displayed, so you can set defaults for each trap type. [![Line walk defaults](https://help.trap.nz/uploads/images/gallery/2022-05/scaled-1680-/image-1651711699493.jpeg)](https://help.trap.nz/uploads/images/gallery/2022-05/image-1651711699493.jpeg) Enter a default value for each of the trap types on the line, then press "Continue". [![Trap defaults on a line](https://help.trap.nz/uploads/images/gallery/2022-05/scaled-1680-/image-1651711880523.jpeg)](https://help.trap.nz/uploads/images/gallery/2022-05/image-1651711880523.jpeg) After setting the default values, The options will blank out and only open and show when you are within the proximity you have set in lines. You are ready to start walking the line. [![WTL starting screen](https://help.trap.nz/uploads/images/gallery/2022-05/scaled-1680-/image-1651712092727.jpeg)](https://help.trap.nz/uploads/images/gallery/2022-05/image-1651712092727.jpeg) As you walk the line, the traps that you pass will be highlighted with a green outline to show that a check has been recorded against them. [![image-1645574873173.jpeg](https://help.trap.nz/uploads/images/gallery/2022-02/scaled-1680-/image-1645574873173.jpeg)](https://help.trap.nz/uploads/images/gallery/2022-02/image-1645574873173.jpeg) An indicator bar at the top of the screen shows your progress through the line (green checked, black un-checked, red never-checked / new trap). At any point in time, you can manually select a trap and change from the default record. When you click save, the form for the next trap will be displayed, but you can press "Close" and go back to the line list/map view and continue walking. [![image-1645575285481.jpeg](https://help.trap.nz/uploads/images/gallery/2022-02/scaled-1680-/image-1645575285481.jpeg)](https://help.trap.nz/uploads/images/gallery/2022-02/image-1645575285481.jpeg) When you have finished walking the line, press Finish. [![image-1645575309205.jpg](https://help.trap.nz/uploads/images/gallery/2022-02/scaled-1680-/image-1645575309205.jpg)](https://help.trap.nz/uploads/images/gallery/2022-02/image-1645575309205.jpg) You will then be able to review and edit any records (if any need to be changed from the default), and deselect any records you don't want to save. [![image-1645575394881.PNG](https://help.trap.nz/uploads/images/gallery/2022-02/scaled-1680-/image-1645575394881.PNG)](https://help.trap.nz/uploads/images/gallery/2022-02/image-1645575394881.PNG) Press and hold the "SAVE LINE" button to submit the records. [![image-1645575566067.jpg](https://help.trap.nz/uploads/images/gallery/2022-02/scaled-1680-/image-1645575566067.jpg)](https://help.trap.nz/uploads/images/gallery/2022-02/image-1645575566067.jpg) # Setting defaults using Manual complete #### Adding default settings - Setting default settings in your trap.NZ App is an easy process that can save you time out in the field. - This is helpful when you have a lot of installations to check and update. - There are two ways in which you can set defaults on the trap.NZ App, either “manual complete or “walk line” #### Manual complete *How to add defaults settings using manual complete* Select a line from your trap.NZ App, in this case, I have two lines I will select ridge [![menu (2).png](https://help.trap.nz/uploads/images/gallery/2022-07/scaled-1680-/menu-2.png)](https://help.trap.nz/uploads/images/gallery/2022-07/menu-2.png) [![line options (2).png](https://help.trap.nz/uploads/images/gallery/2022-07/scaled-1680-/line-options-2.png)](https://help.trap.nz/uploads/images/gallery/2022-07/line-options-2.png) This will open all the installations on this line [![line (2).png](https://help.trap.nz/uploads/images/gallery/2022-07/scaled-1680-/line-2.png)](https://help.trap.nz/uploads/images/gallery/2022-07/line-2.png) By selecting manual complete you can now choose to select the default settings before heading out to check your installations [![line walk defaults installations (2).png](https://help.trap.nz/uploads/images/gallery/2022-07/scaled-1680-/line-walk-defaults-installations-2.png)](https://help.trap.nz/uploads/images/gallery/2022-07/line-walk-defaults-installations-2.png) When selecting the installations you want to service it will open up your options ***Traps*** You can select the lure options by using the settings cog [![set defaults trap (2).png](https://help.trap.nz/uploads/images/gallery/2022-07/scaled-1680-/set-defaults-trap-2.png)](https://help.trap.nz/uploads/images/gallery/2022-07/set-defaults-trap-2.png)[![trap lures (2).png](https://help.trap.nz/uploads/images/gallery/2022-07/scaled-1680-/trap-lures-2.png)](https://help.trap.nz/uploads/images/gallery/2022-07/trap-lures-2.png) ***Bait Stations*** When you select a bait station you will be asked to include the bait type, you can either choose from one of your “favourite” options, [![set default bait (2).png](https://help.trap.nz/uploads/images/gallery/2022-07/scaled-1680-/set-default-bait-2.png)](https://help.trap.nz/uploads/images/gallery/2022-07/set-default-bait-2.png)[![baits (2).png](https://help.trap.nz/uploads/images/gallery/2022-07/scaled-1680-/baits-2.png)](https://help.trap.nz/uploads/images/gallery/2022-07/baits-2.png) Or you can select add and select a new one [![add baits (2).png](https://help.trap.nz/uploads/images/gallery/2022-07/scaled-1680-/add-baits-2.png)](https://help.trap.nz/uploads/images/gallery/2022-07/add-baits-2.png)[![toxins (2).png](https://help.trap.nz/uploads/images/gallery/2022-07/scaled-1680-/toxins-2.png)](https://help.trap.nz/uploads/images/gallery/2022-07/toxins-2.png) After selecting all your preferred options, the screen will display all the selected installations shaded in green completed with the defaults you have chosen. [![default page (2).png](https://help.trap.nz/uploads/images/gallery/2022-07/scaled-1680-/default-page-2.png)](https://help.trap.nz/uploads/images/gallery/2022-07/default-page-2.png) As you work your way through the installations on your project the trap.NZ App will automatically move to the next installation on your line. This will display by both the trap number and An indicator bar at the top of the screen that shows your progress through the line (green checked, black un-checked, red never-checked / new trap).[![updating installations (2).png](https://help.trap.nz/uploads/images/gallery/2022-07/scaled-1680-/updating-installations-2.png)](https://help.trap.nz/uploads/images/gallery/2022-07/updating-installations-2.png) When you have finished Checking your installations select close to finish your manual complete. # Steps to help ensure your trap.nz phone app has accurate GPS locations ##### When using the trap.nz phone app, you will need to follow these steps to minimise GPS locations being incorrect. Please read the following link which explains GPS accuracy and why sometimes the GPS coordinates are not where you expect them to be. [General notes on phone GPS accuracy, what to expect, how to improve results.](https://medium.com/@importanttech/we-tested-mobile-gps-gnss-accuracy-and-found-some-surprising-results-b9ec35873e2e) **For android phones** The phone needs to have: 1. The [location services set to While in Use, or Always On](https://support.google.com/accounts/answer/6179507?hl=en) (Android, iOS) 2. Have[ battery optimisation turned **off** for the Trap.nz app](https://support.google.com/pixelphone/answer/7015477?hl=en&sjid=3742722798902342138-AP) (Android.) **IMPORTANT:** For [recording tracks](https://help.trap.nz/books/trapnz-comprehensive-user-guide/page/app-recording-a-gps-track "App: Recording a GPS track") and using [Line Walk](https://help.trap.nz/books/trapnz-comprehensive-user-guide/page/app-using-the-walk-line-proximity-function "App: Using the "Walk Line" proximity function") features, failing to do use **Always On** will mean no tracks are recorded when the app is in the background (i.e. in your pocket.) # App: Recording a GPS track **Note:** The phone needs to have [location services set to Always On](https://support.google.com/accounts/answer/6179507?hl=en) (Android, iOS) AND have [battery optimisation turned **off** for the Trap.nz app](https://support.google.com/pixelphone/answer/7015477?hl=en&sjid=3742722798902342138-AP) (Android.) Failing to do so will mean no tracks are recorded when the app is in the background (i.e. in your pocket.) # Proximity servicing adjustments The detection zone for automated installation servicing based on proximity can be adjusted to suit your needs and your GPS accuracy. There are limitations based on geography and available satellites. These adjustments are there to help but cannot work around all issues. [General notes on phone GPS accuracy, what to expect, how to improve results.](https://medium.com/@importanttech/we-tested-mobile-gps-gnss-accuracy-and-found-some-surprising-results-b9ec35873e2e) **For android phones** The phone needs to have: 1. The [location services set to While in Use, or Always On](https://support.google.com/accounts/answer/6179507?hl=en) (Android, iOS) 2. Have[ battery optimisation turned **off** for the Trap.nz app](https://support.google.com/pixelphone/answer/7015477?hl=en&sjid=3742722798902342138-AP) (Android.) For [recording tracks](https://help.trap.nz/books/trapnz-comprehensive-user-guide/page/app-recording-a-gps-track "App: Recording a GPS track") and using [Line Walk](https://help.trap.nz/books/trapnz-comprehensive-user-guide/page/app-using-the-walk-line-proximity-function "App: Using the "Walk Line" proximity function") features, failing to do use Always On will mean no tracks are not recorded when the app is in the background (i.e. in your pocket.) Where accuracy is very low, it can help to set the Proximity Max Distance higher. This will mean more installations are serviced in error, so more care is required in the review process. Equally setting it finer means installations will be missed. Trial and error and personal preference will dictate how this is set.
[![image-1655412197745.jpg](https://help.trap.nz/uploads/images/gallery/2022-06/scaled-1680-/image-1655412197745.jpg)](https://help.trap.nz/uploads/images/gallery/2022-06/image-1655412197745.jpg) [![image-1655412217393.jpg](https://help.trap.nz/uploads/images/gallery/2022-06/scaled-1680-/image-1655412217393.jpg)
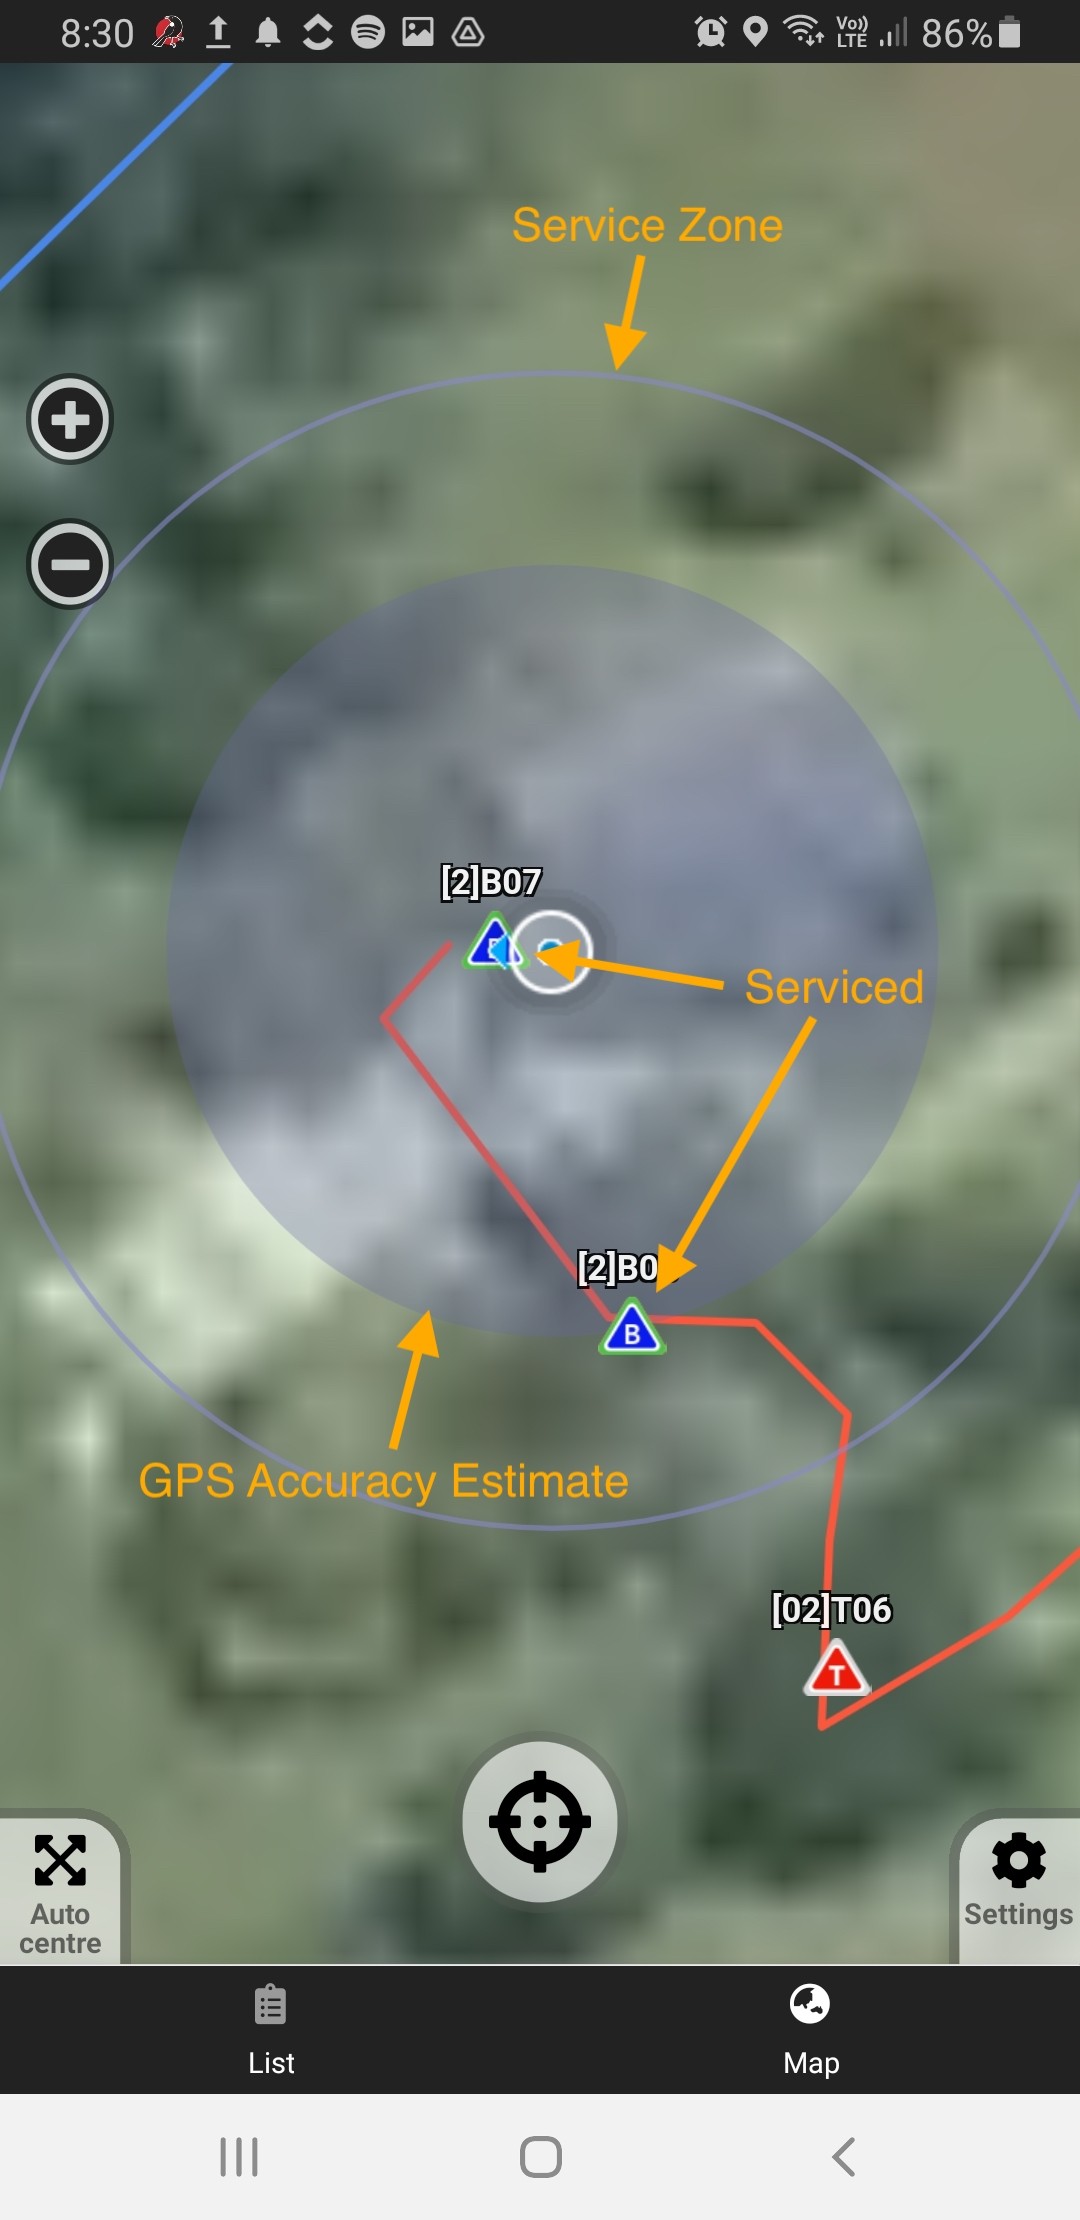
](https://help.trap.nz/uploads/images/gallery/2022-06/image-1655412217393.jpg)
[![image-1655412274912.jpg](https://help.trap.nz/uploads/images/gallery/2022-06/scaled-1680-/image-1655412274912.jpg)](https://help.trap.nz/uploads/images/gallery/2022-06/image-1655412274912.jpg) [![image-1655412290254.jpg](https://help.trap.nz/uploads/images/gallery/2022-06/scaled-1680-/image-1655412290254.jpg)
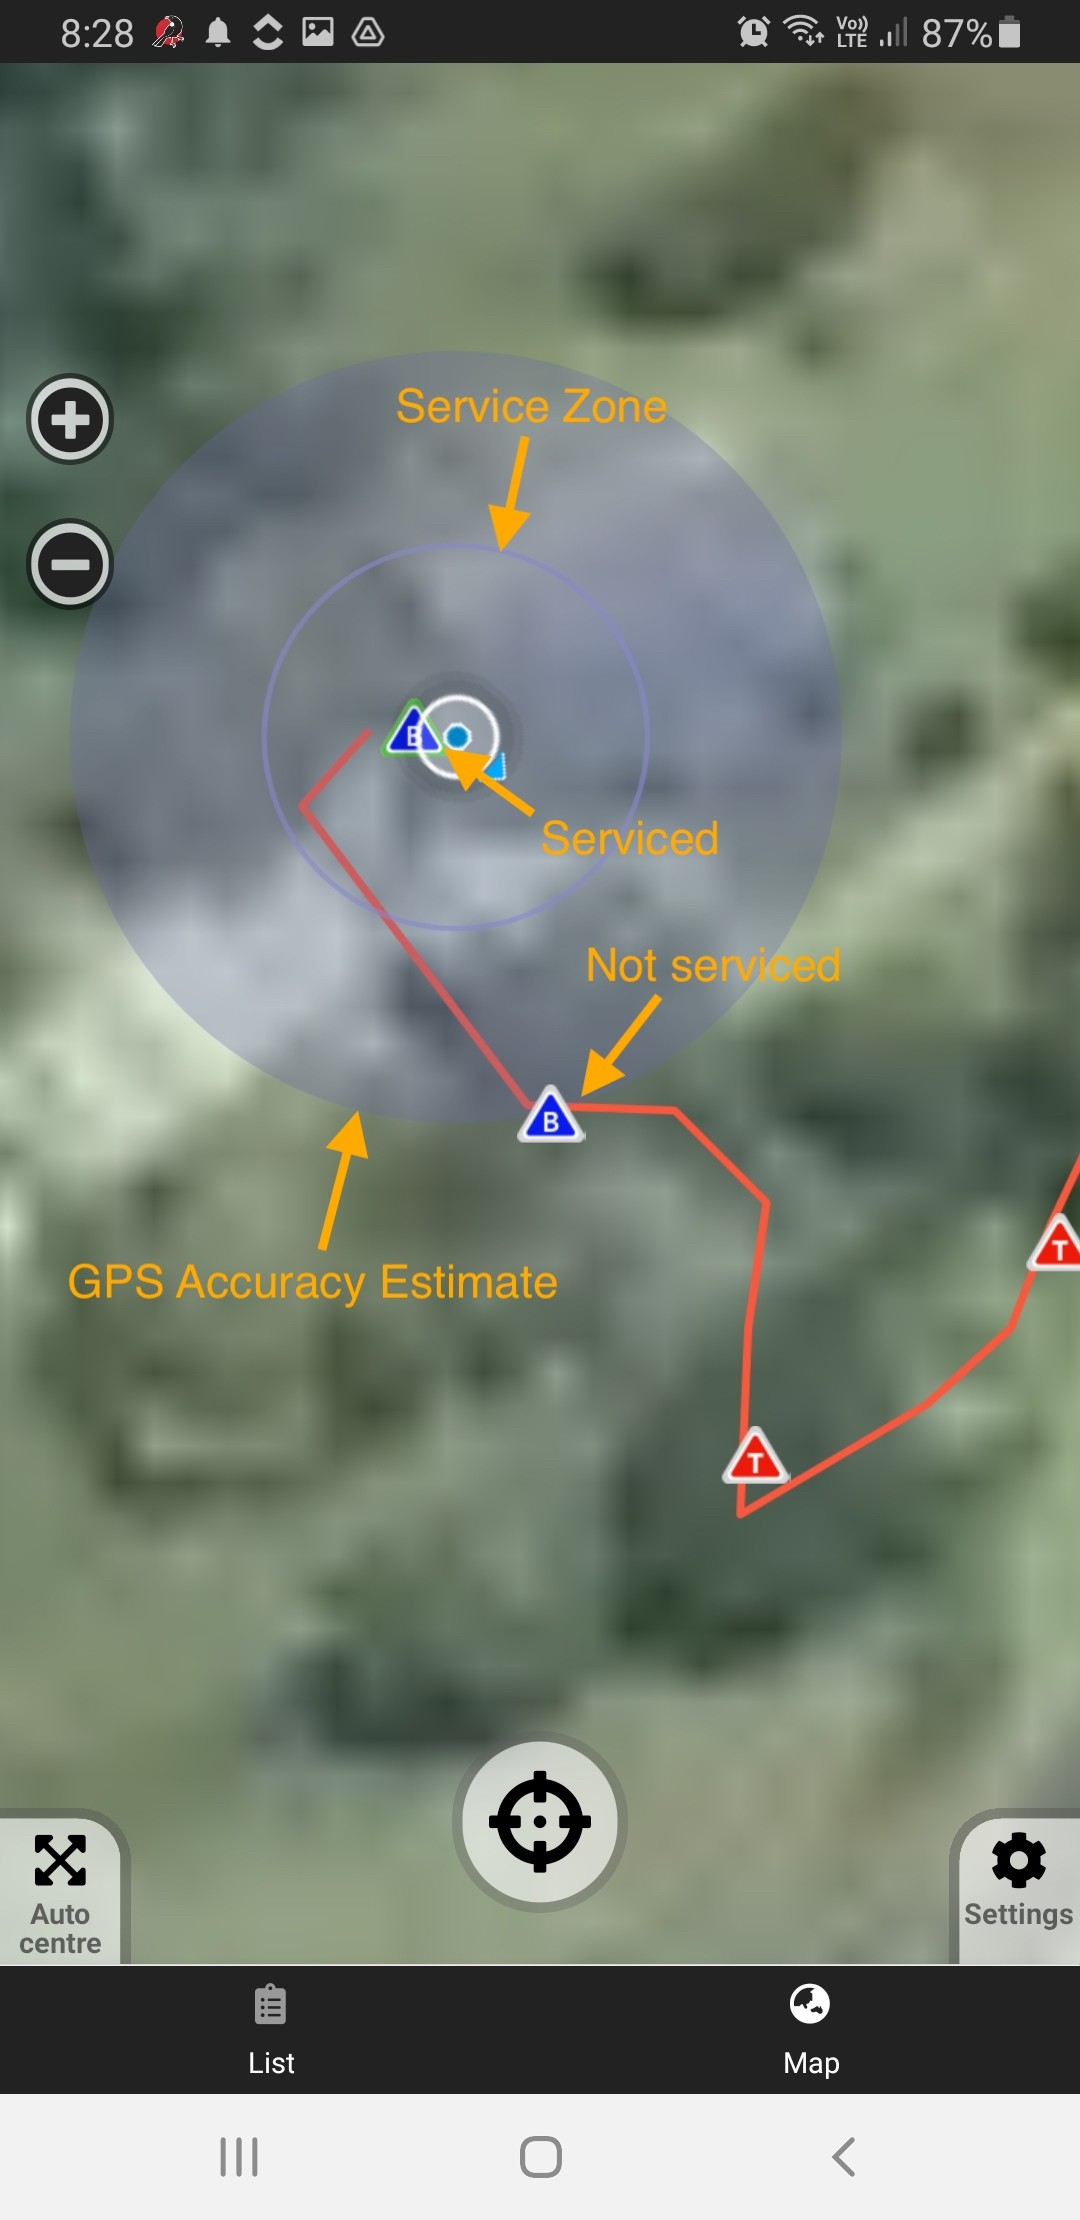
](https://help.trap.nz/uploads/images/gallery/2022-06/image-1655412290254.jpg)
#### Disabling GPS mode In some circumstances it will be more appropriate to temporarily turn off the GPS servicing via the GPS toggle button (see below.) With the GPS Servicing turned off, the GPS track is still recording, but installations within range won't be automatically serviced. Examples of turning it off might be you've run out of fresh rabbit so can't service the last 20 traps, or the weather has turned bad, so you head home early. Generally you'll want a complete record of where you went and how long it took. This gives you the opportunity to prevent the installations from being automatically serviced. [![image-1655412716405.jpg](https://help.trap.nz/uploads/images/gallery/2022-06/scaled-1680-/image-1655412716405.jpg)](https://help.trap.nz/uploads/images/gallery/2022-06/image-1655412716405.jpg) # Using Advanced field settings app This setting allows for the option to collect more data that the standard settings while also [enabling contractor mode](https://help.trap.nz/books/trapnz-comprehensive-user-guide/page/using-contractor-mode) 1. Open the settings menu on your trap.nz phone app and under the sub-heading Records select [Enable advanced record fields](https://help.trap.nz/books/trapnz-comprehensive-user-guide/page/app-general-settings) [![1.png](https://help.trap.nz/uploads/images/gallery/2022-08/scaled-1680-/CTa1.png)](https://help.trap.nz/uploads/images/gallery/2022-08/CTa1.png) 2. In the advanced field select Enable Contractor Mode [![2.png](https://help.trap.nz/uploads/images/gallery/2022-08/scaled-1680-/Hzs2.png)](https://help.trap.nz/uploads/images/gallery/2022-08/Hzs2.png) 3\. As you service your installations after you select the species, you will now have available to you extra fields that allow you to add maturity and sex of the catch [![3.png](https://help.trap.nz/uploads/images/gallery/2022-08/scaled-1680-/X0P3.png)](https://help.trap.nz/uploads/images/gallery/2022-08/X0P3.png) # Using Contractor mode Contractor mode allows you to add property owners’ details into an installation’s details. This will help anyone entering another person's property to easily be able to contact them and advise them of the visit. 1\. To enable contractor mode select settings on your trap.NZ menu page [![1 (2).png](https://help.trap.nz/uploads/images/gallery/2022-07/scaled-1680-/1-2.png)](https://help.trap.nz/uploads/images/gallery/2022-07/1-2.png) 2. Select advanced and enable contractor mode [![2 (2).png](https://help.trap.nz/uploads/images/gallery/2022-07/scaled-1680-/2-2.png)](https://help.trap.nz/uploads/images/gallery/2022-07/2-2.png) 3. Reset App and hold. Now when you are ready to create a new installation select the green tick. [![3 (2).png](https://help.trap.nz/uploads/images/gallery/2022-07/scaled-1680-/3-2.png)](https://help.trap.nz/uploads/images/gallery/2022-07/3-2.png) 4. Select the installation type [![4 (2).png](https://help.trap.nz/uploads/images/gallery/2022-07/scaled-1680-/4-2.png)](https://help.trap.nz/uploads/images/gallery/2022-07/4-2.png) 5. You now have a new contact section in your installation details menu [![5 (2).png](https://help.trap.nz/uploads/images/gallery/2022-07/scaled-1680-/5-2.png)](https://help.trap.nz/uploads/images/gallery/2022-07/5-2.png) 6. This opens up to allow you to record property owners’ details [![6 (2).png](https://help.trap.nz/uploads/images/gallery/2022-07/scaled-1680-/zxY6-2.png)](https://help.trap.nz/uploads/images/gallery/2022-07/zxY6-2.png) # Creating and Opening images taken using the trap.NZ App camera #### This is helpful to projects wanting a visual reference of installations or their surrounds Projects may use images for many reasons, to show points of interest, signage, vandalism, or catches, the options are endless. The trap.NZ App allows you to create an image for your records, that can be referred to at a later date. 1. To create an image, use the individual installations recording page to find the camera icon and capture an image [![image-1659300783136.jpg](https://help.trap.nz/uploads/images/gallery/2022-07/scaled-1680-/image-1659300783136.jpg)](https://help.trap.nz/uploads/images/gallery/2022-07/image-1659300783136.jpg) 2. Your image will display for you to review [![image-1659300873232.jpg](https://help.trap.nz/uploads/images/gallery/2022-07/scaled-1680-/image-1659300873232.jpg)](https://help.trap.nz/uploads/images/gallery/2022-07/image-1659300873232.jpg) 3. SAVE AND HOLD to save the image to your records [![3.jpg](https://help.trap.nz/uploads/images/gallery/2022-07/scaled-1680-/3.jpg)](https://help.trap.nz/uploads/images/gallery/2022-07/3.jpg) Using the [**trap.NZ website**](https://trap.nz/) select the installation you have saved the image to and open the records for it. 4. After selecting the installation you will see the pic icon, click on this to open the recorded image [![4.png](https://help.trap.nz/uploads/images/gallery/2022-07/scaled-1680-/tst4.png)](https://help.trap.nz/uploads/images/gallery/2022-07/tst4.png) # Exporting your Trap.nz app service logs Occasionally, there will be an issue when out checking or installing your installations. These can be due to a number of things, such as not syncing your project prior to leaving network reception, syncing has timed out, the server being down, or a problem with the data submitted (possible if an installation has been removed/altered centrally) The app stores all attempted service records to the logs - successful or otherwise. These logs can be used to debug issues and restore failed service records. When issues occur the logs can be exported and sent to Trap.nz for analysis. The procedure is as follows:
To find your trap.nz phone app logs, click on the **Menu button** ("hamburger" icon) at the top right of the screen,[![1.png](https://help.trap.nz/uploads/images/gallery/2023-03/scaled-1680-/1.png)](https://help.trap.nz/uploads/images/gallery/2023-03/1.png)
Select **Logs** [![2.png](https://help.trap.nz/uploads/images/gallery/2023-03/scaled-1680-/2.png)
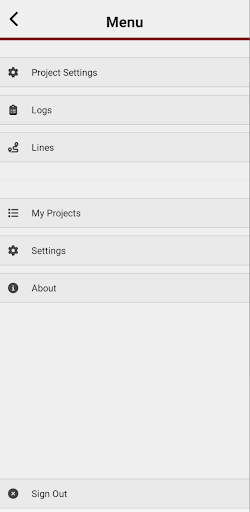
](https://help.trap.nz/uploads/images/gallery/2023-03/2.png)
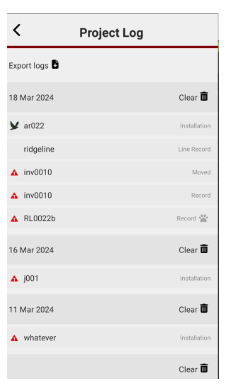
If an error has occurred, the error icon will display next to the log entry affected. Tap the "**Export logs**" button, and choose the required export format. For debugging errors, the **JSON** format is required by Trap.nz. The best practice is to email them to yourself and a copy to trap.nz at . [![3.png](https://help.trap.nz/uploads/images/gallery/2023-03/scaled-1680-/3.png)
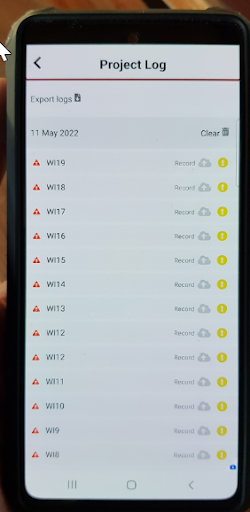
](https://help.trap.nz/uploads/images/gallery/2023-03/3.png)
# Resetting the trap.nz phone app trap.nz often has updates, however, despite vigorous testing, sometimes there can be issues that are found after a release that is unexpected. Here are the steps to take if you find that your trap.nz phone app is not showing as you expect it to. ### Exporting your logs 1. Access the menu by the three lines at the top right of the screen. [![1.png](https://help.trap.nz/uploads/images/gallery/2024-03/scaled-1680-/1.png)](https://help.trap.nz/uploads/images/gallery/2024-03/1.png) 2. Click on the **Logs** tab [![2.png](https://help.trap.nz/uploads/images/gallery/2024-03/scaled-1680-/2.png)](https://help.trap.nz/uploads/images/gallery/2024-03/2.png) This will show any records that are still in your phone. (this step is to ensure that in case of records not synching you have access to them if needed), ensure you have done this for all of the projects you have completed work in during the last week. 3. Click on the Export logs tab at the top left side of the screen
[![3.png](https://help.trap.nz/uploads/images/gallery/2024-03/scaled-1680-/3.png)](https://help.trap.nz/uploads/images/gallery/2024-03/3.png)[![10.png](https://help.trap.nz/uploads/images/gallery/2024-03/scaled-1680-/10.png)
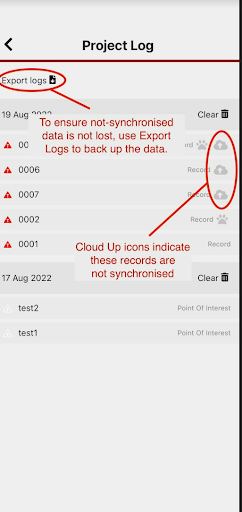
](https://help.trap.nz/uploads/images/gallery/2024-03/10.png)
4. Click on the export debug log and email it to yourself. **You will need to do these steps for ALL the projects you have added records for that show the records haven't migrated to the website already.** [![4.png](https://help.trap.nz/uploads/images/gallery/2024-03/scaled-1680-/4.png)](https://help.trap.nz/uploads/images/gallery/2024-03/4.png) 5. A pop-up will appear showing the options, if mail is not one of them, check the “more” section.[![5.png](https://help.trap.nz/uploads/images/gallery/2024-03/scaled-1680-/5.png)](https://help.trap.nz/uploads/images/gallery/2024-03/5.png) ### **Resetting your app** 6\. Export the logs to yourself, and if they show a yellow triangle icon send a copy to . After completing this go back into the menu and click on settings [![6.png](https://help.trap.nz/uploads/images/gallery/2024-03/scaled-1680-/6.png)](https://help.trap.nz/uploads/images/gallery/2024-03/6.png) 7. Then click on advanced settings. [![7.png](https://help.trap.nz/uploads/images/gallery/2024-03/scaled-1680-/7.png)](https://help.trap.nz/uploads/images/gallery/2024-03/7.png) 8. Then press and hold on the Hard reset. [![8.png](https://help.trap.nz/uploads/images/gallery/2024-03/scaled-1680-/8.png)](https://help.trap.nz/uploads/images/gallery/2024-03/8.png) 9. You will receive this message, ensure you have completed all of the steps a-c then click Perform reset. The app will refresh and the projects should appear as you would expect. [![9.png](https://help.trap.nz/uploads/images/gallery/2024-03/scaled-1680-/9.png)](https://help.trap.nz/uploads/images/gallery/2024-03/9.png) It is recommended that you restart the app after this step to ensure everything is correctly showing. If you still have issues with the app after completing these steps contact[ support@trap.nz ](mailto:support@trap.nz) # Check your sensors [![2024-04-09 13_35_19-check-your-sensors-doc.pdf - Google Drive.png](https://help.trap.nz/uploads/images/gallery/2024-04/scaled-1680-/2024-04-09-13-35-19-check-your-sensors-doc-pdf-google-drive.png)](https://help.trap.nz/uploads/images/gallery/2024-04/2024-04-09-13-35-19-check-your-sensors-doc-pdf-google-drive.png)