
App: General settings
When you first open the Settings menu, you will see each of the categories listed. Tap on the category you want to view the settings for, and the settings for that category will become visible.
You can click the question mark next to each option to get more information about what the option does.
Map
 Enable base map options
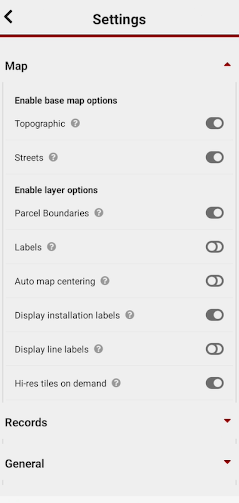
Enabling any of these base map options makes them available via the layer control on the map, so you can switch between the enabled base map options.
Satellite
Enables the satellite base map.
Topographic
Enables the topographic base map.
Streets
Enables the street's base map.
Enable layer options
Layer options provide additional detail to the map.
Parcel Boundaries
Provides a map of the land, road, and other parcel boundaries, which is great for contractors and volunteers on private and public land. These are displayed as a black outline overlaid on top of the current base map.
Labels
Shows labels for regions, cities, towns, and street names on top of the current base map.
Auto map centering
Automatically move the map to keep your location in the centre of the screen.
Display installation labels
This will turn labels on or off for your traps, bait stations, and monitoring sites. The labels only show when you are zoomed in.
Display line labels
This will turn labels on or off for your lines in the map view.
Hi-res tiles on demand
This setting will automatically download higher detail maps when you have an internet connection available (mobile or WiFi). Ideal for urban projects where network coverage is available and higher accuracy is required. These are only stored temporarily on your device and won't be available offline. To save high-detail map tiles for offline use, change the Max tile set size in Project settings.
Records
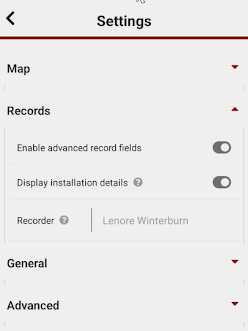
Enable advanced record fields
Enables advanced record fields such as Sex and Life stage
Display installation details
Installations can have notes entered against them on the website. Notes can be used to record hazards or access details. Notes (including some other information like coordinates and when the last record was added) can be automatically displayed when adding a record. Check this box to automatically display the installation notes.
Recorder
The name is used to identify records you make. Defaults to your name on Trap.NZ.
General
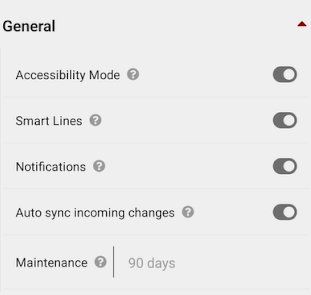
Accessibility Mode
Where possible and appropriate display user-friendly labels on buttons, larger fonts, etc
Smart Lines
Smart lines will automatically pull other installations into an existing line if it is within a metre of another line member
If switched off, only installations that are at the exact coordinates of line members will be pulled in.
Notifications
Help popups will appear in some situations - you can disable these once you know your way around the app.
Auto-sync incoming changes
By default, this setting is enabled, and the project will automatically update when project changes occur. This can affect performance on large projects with multiple trappers working simultaneously - in which case we recommend disabling this setting.
![]() When disabled, a cloud download button will appear in the menu bar when changes are detected. Press this to manually sync the changes.
When disabled, a cloud download button will appear in the menu bar when changes are detected. Press this to manually sync the changes.
Maintenance
After this period, installations are highlighted in red to indicate they need attention. Defaults to 90 days.
Advanced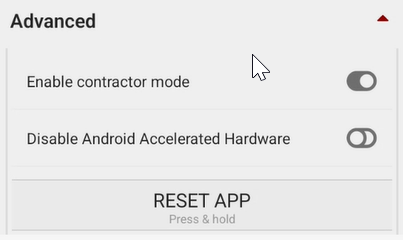

Enable contractor mode
Enables contractor mode. This opens up a contact section in the installations setup screen. The contact details are available on the trap.NZ website under the installation
Disable Android Accelerated Hardware
Reset app
Press and hold this button to reset the app. Any saved settings and un-synced records will be lost.